How to Create a Proxmox VM Template with Ubuntu 22.04 Cloud-Init and Deploy VM Clones via Terraform Bpg/Proxmox
(64GB RAM Kubernetes Cluster for €39/month — Part 2)
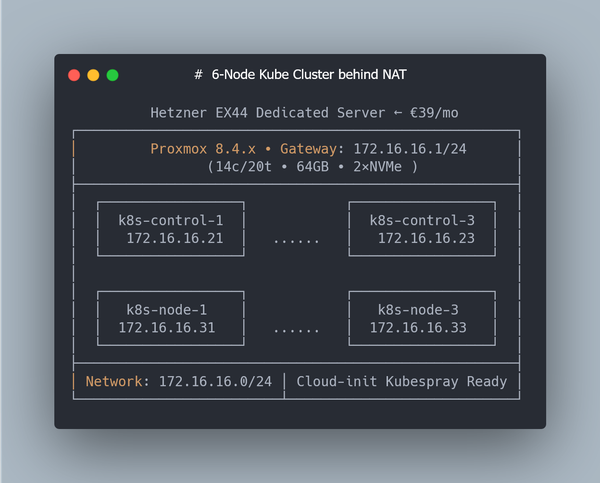
This is Part 2 of a multi-part series on building a Kubernetes homelab / stage environment with Proxmox and Hetzner hardware.
In Part 1 we prepared the host: installed Debian 12, configured RAID-0 across two NVMe SSDs, set up LVM storage, and enabled NAT networking. That gave us a clean Proxmox VE installation, ready to run virtual machines.
Now comes the next step — automation.
Manually creating VMs through the Proxmox UI is fine for quick experiments, but real workflows don’t scale that way. If you want to:
-
Spin up 3–5 Kubernetes nodes with predictable IPs,
-
Rebuild your cluster from scratch in minutes,
-
Keep your infrastructure as code and version it,
…then you need templates and Terraform.
In this part we’ll:
- Build a reusable Ubuntu 22.04 cloud-init template in Proxmox,
- Create a Proxmox user with API token for Terraform,
- Write Terraform code to clone multiple VMs with defined RAM, CPU, IP addresses, and SSH keys.
By the end you’ll be able to treat your Proxmox box as a small-scale cloud: declarative configs in → ready-to-provision Kubernetes nodes out.
Step 0: Downloading the Official Ubuntu Cloud Image (22.04)
Instead of installing Ubuntu from an ISO, we’ll use the official Ubuntu Cloud Image. These images are optimized for automation and are the same base used in AWS, Azure, and GCP.
SSH into the Proxmox host and download the latest Jammy (22.04) image:
cd /var/lib/vz/template/iso
wget -c https://cloud-images.ubuntu.com/jammy/current/jammy-server-cloudimg-amd64.img
mv jammy-server-cloudimg-amd64.img ubuntu-22.04-cloudinit.img
This .img file is preconfigured to work with cloud-init, which will later inject SSH keys, hostnames, and network settings into our cloned VMs.
Step 2: Import the Cloud Image and Create a VM Template
Now that we’ve downloaded the official Ubuntu 22.04 cloud image, let’s turn it into a reusable VM template.
What’s a template in Proxmox?
A template is a special kind of VM that can’t be started directly — instead, you clone it into real VMs. This allows you to:
- Create multiple identical machines (control plane / worker nodes)
- Use Terraform or qm clone without redoing setup each time
- Avoid boot errors from duplicated disk UUIDs or hostnames
Think of it as your golden image — configured once, then reused across the cluster. Let's create one.
This time we will using q35 + UEFI, which is the modern baseline for most cloud environments.
Why q35 + UEFI?
- q35 emulates a modern Intel chipset with PCIe support (better device compatibility).
- UEFI (OVMF) is closer to how VMs boot in AWS, Azure, and GCP.
- Legacy i440fx works fine, but q35 + UEFI is more future-proof for cloud-init–based templates.
2.1 Create a minimal placeholder VM
We start by creating a placeholder VM with q35 machine type and UEFI BIOS (OVMF). We also add a small EFI disk to store UEFI variables.:
qm create 9000 \
  --name ubuntu-22-04-template \
  --memory 2048 \
  --cores 2 \
  --machine q35 \
  --bios ovmf \
  --efidisk0 local-lvm:0,pre-enrolled-keys=1 \
  --net0 virtio,bridge=vmbr0
9000- VM ID (you can choose any unused number)--name— logical name shown in the Proxmox UI--memoryand--cores— minimal specs for the template--machine q35— enables modern PCIe-based machine type.--bios ovmf— tells Proxmox to use UEFI firmware.--efidisk0 local-lvm:0,pre-enrolled-keys=1— adds a tiny EFI disk to save firmware variables and Secure Boot keys.--net0— attaches a virtio network interface to your bridge (vmbr0)
ℹ️ What is EFI/UEFI and why do we need efidisk0?
When you switch a VM to q35 + UEFI (OVMF), Proxmox emulates modern UEFI firmware instead of old Legacy BIOS.
Unlike BIOS, UEFI needs a small persistent disk to store firmware variables (boot order, Secure Boot keys, etc.). That’s why we add an EFI Disk (efidisk0).
- UEFI vs BIOS
- BIOS boots from the first 512 bytes of a disk (MBR).
- UEFI boots from a dedicated EFI System Partition (ESP) and supports GPT disks, PCIe devices, and modern drivers.
- EFI disk (
efidisk0)- A tiny virtual disk created by Proxmox.
- Stores UEFI settings for that VM, so they survive reboots.
- Without it, the VM behaves as if you “pulled the BIOS battery” on every boot.
pre-enrolled-keys=1- Refers to Secure Boot. With this option, Proxmox preloads standard vendor keys (Microsoft, Ubuntu, Red Hat).
- Useful if you want to enforce Secure Boot.
- For DevOps labs and Kubernetes clusters, you usually don’t need this, so you can just run:
qm set 9000 --efidisk0 local-lvm:0
BIOS vs UEFI (quick comparison)
| Feature | Legacy BIOS (i440fx) | UEFI (q35 + OVMF) |
|---|---|---|
| Boot method | Reads first 512 bytes (MBR) | Loads EFI bootloader from ESP |
| Disk support | Up to 2 TB (MBR) | GPT, many TBs+ |
| Device model | Old PCI bus | Modern PCIe bus |
| VM compatibility | Works with almost anything | Needed for modern cloud images |
| Boot config persistence | Stored in firmware only | Stored on EFI disk (efidisk0) |
| Secure Boot | Not available | Supported (with vendor keys) |
| Best use cases | Legacy OS, maximum stability | Modern Linux/Windows, cloud-init |
2.2 Import the cloud image to LVM
qm importdisk 9000 ubuntu-22.04-cloudinit.img local-lvm
This command takes the downloaded Ubuntu qcow2 cloud image and imports it into your local-lvm storage.
- The qcow2 file is unpacked and converted into a raw logical volume (LV).
- That volume is now tied to VM 9000, but not yet attached as a usable disk.
💡 In other words: this step puts the OS image into your Proxmox storage, so the VM can boot from it later. Until you attach it, it just sits there as an “unused disk.”
2.3 Attach the disk as boot volume
qm set 9000 --scsihw virtio-scsi-single --scsi0 local-lvm:vm-9000-disk-1
This tells Proxmox:
--scsihw virtio-scsi-single- use the single-controller mode of virtio-scsi, where each disk gets its own controller.- This improves parallel I/O performance.
- Allows enabling
iothread=truefor each disk. - Recommended for databases, Kubernetes PV workloads, and high-IO applications.
--scsi0 local-lvm:vm-9000-disk-1— attach the imported raw disk as the VM’s primary boot device.
💡 After this step, VM 9000 now has a proper root disk with Ubuntu installed, ready to boot.
2.4 Add cloud-init drive
This is the special drive that cloud-init reads on first boot (for injecting SSH keys, hostname, user config, etc.):
qm set 9000 --ide2 local-lvm:cloudinit
qm set 9000 --serial0 socket --vga serial0
- Cloud-init must be attached as ide2
- The
serial0settings allow you to view logs during boot (over serial console)
How the Cloud-Init disk works
When you attach local-lvm:cloudinit, Proxmox generates a tiny virtual disk with your VM’s metadata (SSH keys, hostname, network settings). On the first boot, Ubuntu reads this disk and applies the configuration.
Think of it as a companion to the main OS image:
               ┌─────────────────────────┐
               │        VM (ID 9000)     │
               │                         │
               │  ┌───────────────┐      │
               │  │ Boot Disk     │      │
               │  │ (Ubuntu 22.04 │      │
               │  │  Cloud Image) │      │
               │  └───────────────┘      │
               │                         │
               │  ┌───────────────┐      │
               │  │ Cloud-Init    │      │
               │  │ Disk          │      │
               │  │ (SSH key,     │      │
               │  │ hostname, net │      │
               │  │ config)       │      │
               │  └───────────────┘      │
               │                         │
               └─────────────────────────┘
💡 Without this extra disk, Ubuntu wouldn’t know which SSH key or network settings to use after cloning.
2.5 Set the boot order
By default, Proxmox may try to boot from the Cloud-Init disk first — which won’t work, because it only contains metadata (SSH keys, hostname, network settings). We need to make sure the Ubuntu image (scsi0) is the first boot device.
qm set 9000 --boot order=scsi0
This ensures:
- scsi0 - Ubuntu OS image (root disk) is the first boot device.
- ide2 - Cloud-Init metadata disk remains attached, but will not be used for boot.
💡 Without this setting, the VM may show “No bootable device” at startup, because it’s trying to boot from the Cloud-Init disk instead of the actual OS.
2.6 (Optional) Enable QEMU Guest Agent
This improves integration with the VM (e.g. IP reporting, shutdown, file copy):
qm set 9000 --agent enabled=1
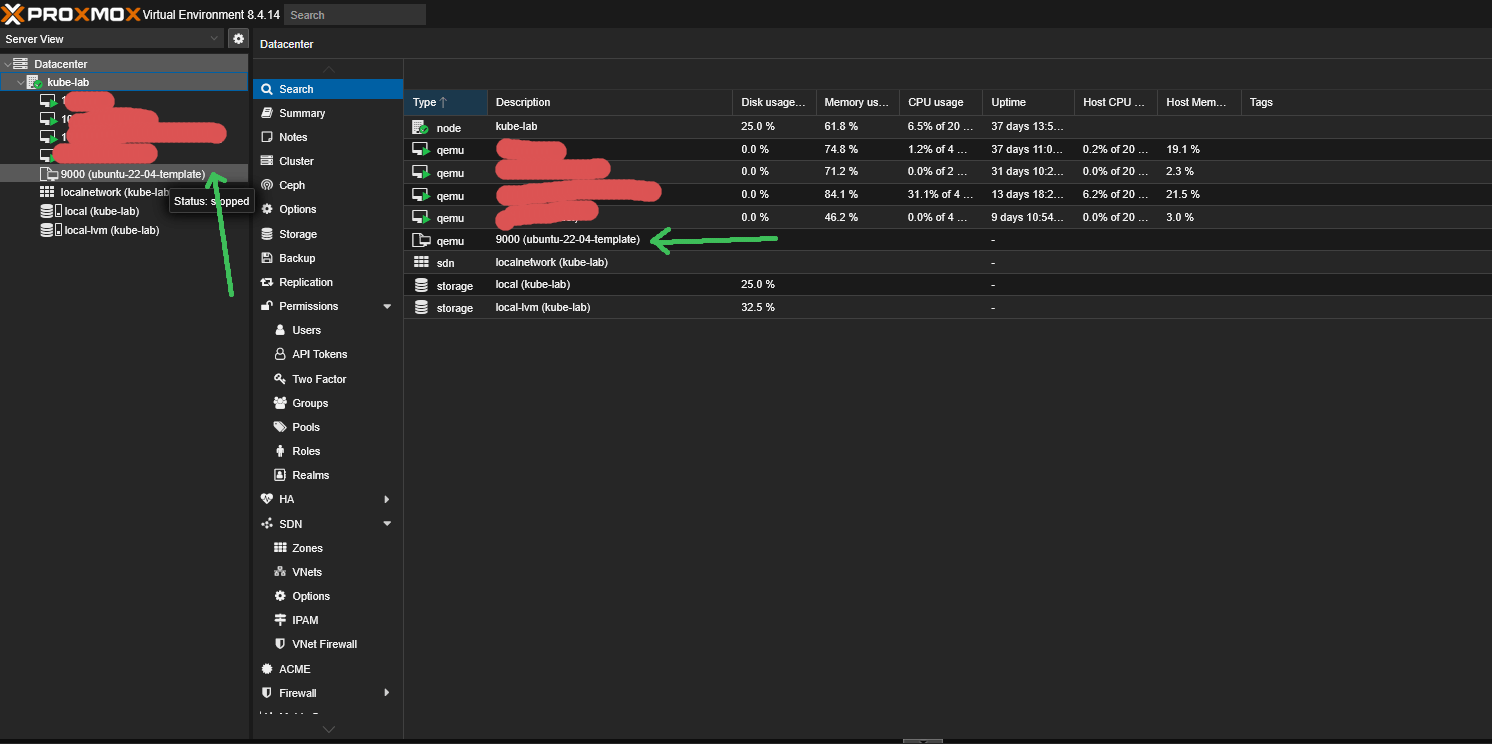
2.7 Convert VM to template
This is the key step — instead of being a regular VM, this will become a reusable image:
qm template 9000
Once converted, this template can’t be started — only cloned.
💡 Tip for manual clones
The official Ubuntu Cloud Image has a virtual root disk size of ~2–2.3 GB.
The downloaded qcow2 file looks smaller (~600–700 MB) because it’s compressed, but after you run qm importdisk, Proxmox expands it into a raw LV of about 2.2 GB.
That’s enough to boot, but often too small if cloud-init tries to run apt upgrade on the first boot.
If you’re cloning a VM manually from this template (not via Terraform), resize the root disk before the first boot:
qm resize <VMID> scsi0 20G
Ubuntu’s cloud-init (growpart) will automatically expand the filesystem to fill the new disk size on first boot.
Now this template is ready to be cloned automatically by Terraform in the next steps.
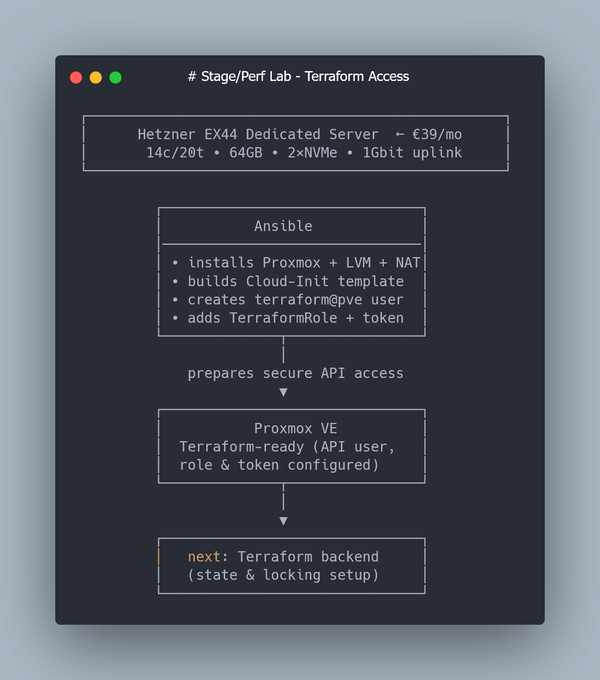
Step 3: Create a Proxmox User and API Token for Terraform
Terraform interacts with Proxmox over the API.
For security (and reproducibility), it’s better to create a dedicated user with a token, instead of reusing your root account.
We’ll create:
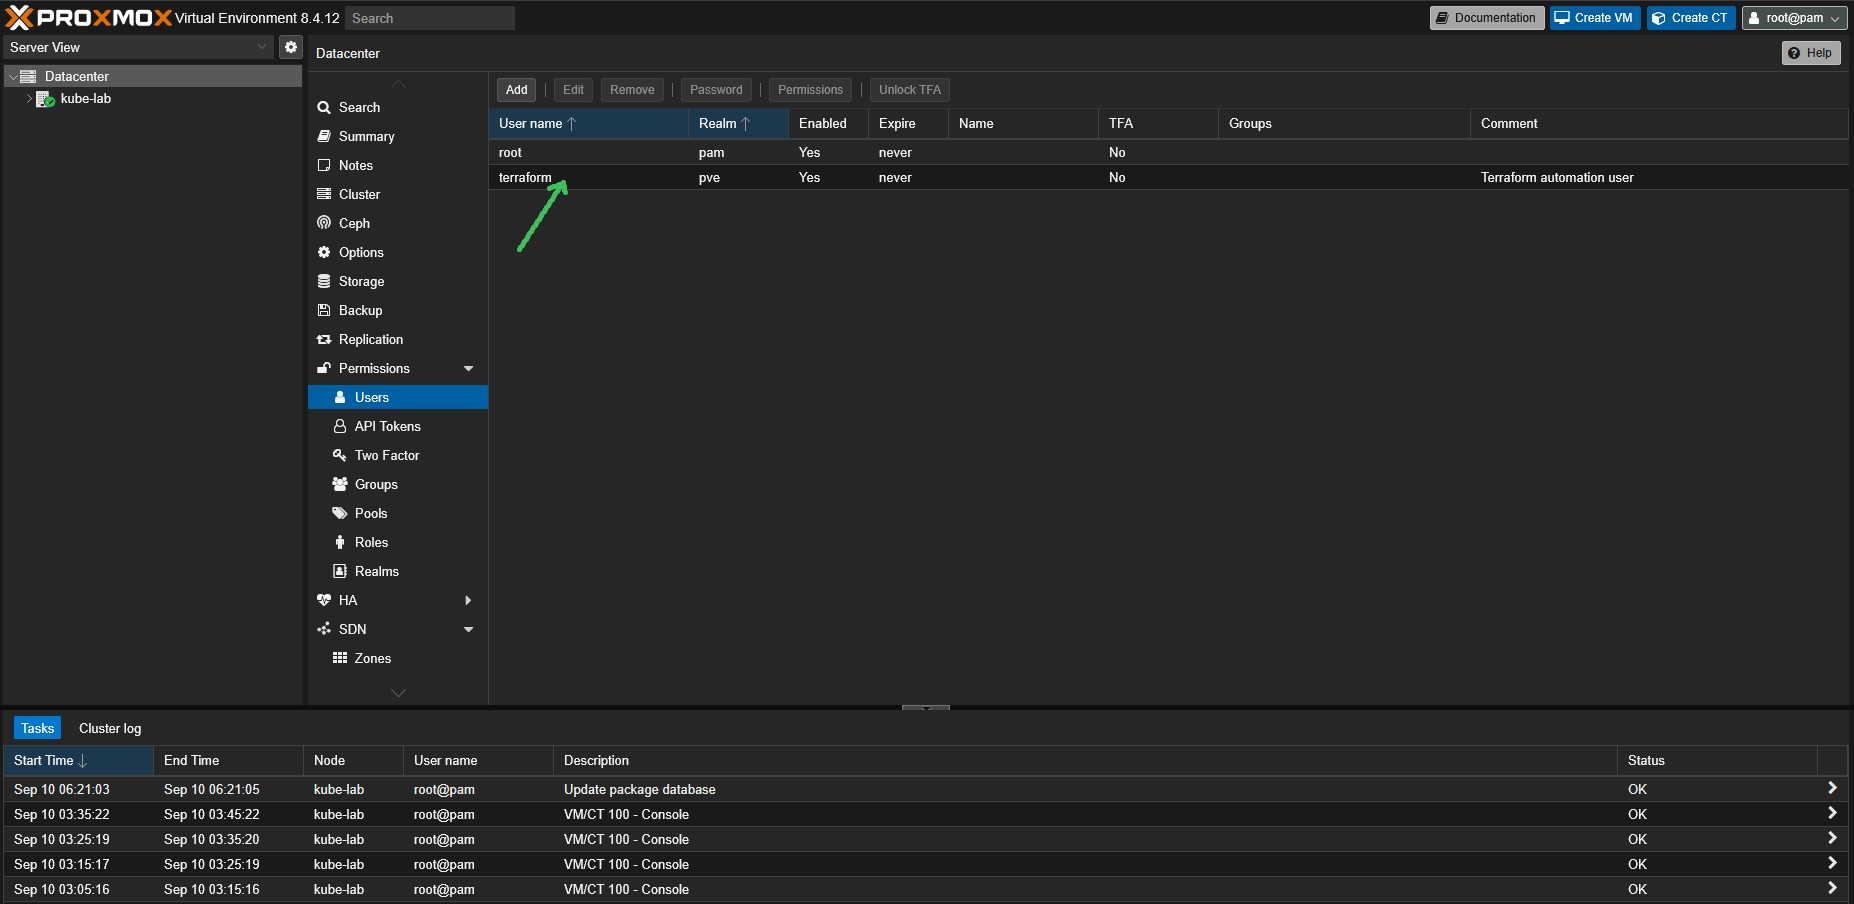
- a new user terraform@pve
- an API token (
terraform-token) - a custom role TerraformRole with only the permissions needed for VM lifecycle
ℹ️ Note on authentication realms: pam vs pve
In Proxmox each user belongs to an authentication realm. The two most common are:
- pam — system-level Linux users from
/etc/passwd.
If you createterraform@pam, it will be a normal Linux user with access to the Proxmox API using a password.
This is useful if you integrate Proxmox with system accounts or LDAP, but it ties API access to your host’s user management. - pve — internal Proxmox realm stored in
/etc/pve.
These users exist only inside Proxmox and cannot log into the host system.
This realm is ideal for service accounts and API tokens, because it keeps them isolated from system-level accounts.
In this guide we’ll use terraform@pve, because:
- it separates API users from system users,
- it works seamlessly with API tokens (no passwords),
- and it allows fine-grained role-based access control.
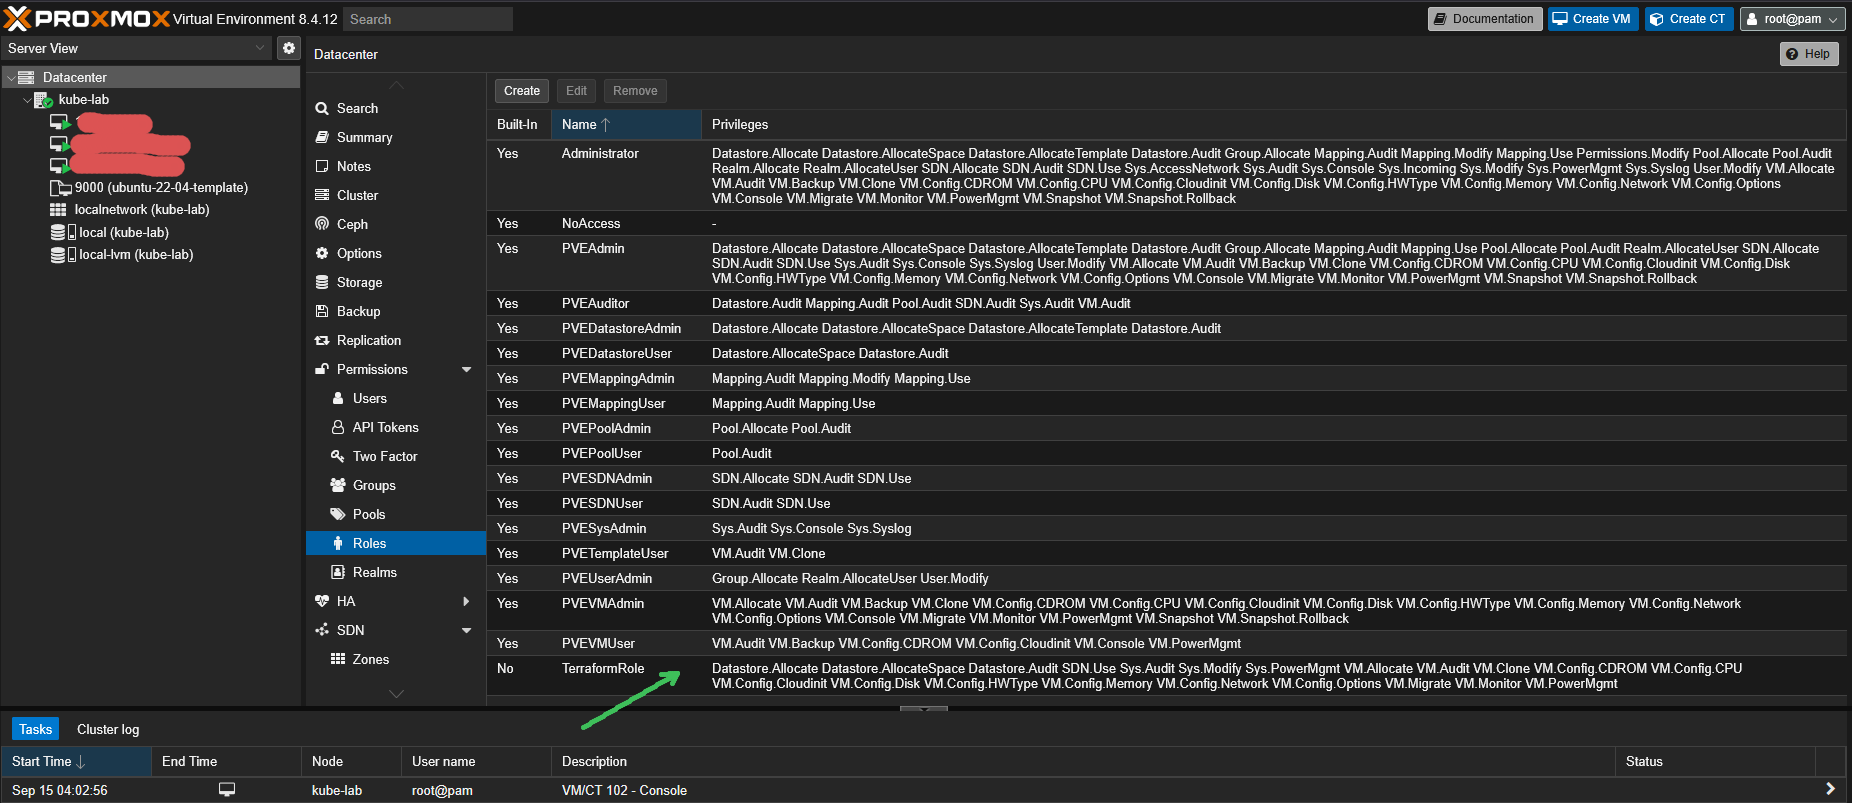
3.1 Proxmox Terraform Role Permissions (Working Config for bpg/proxmox Provider)
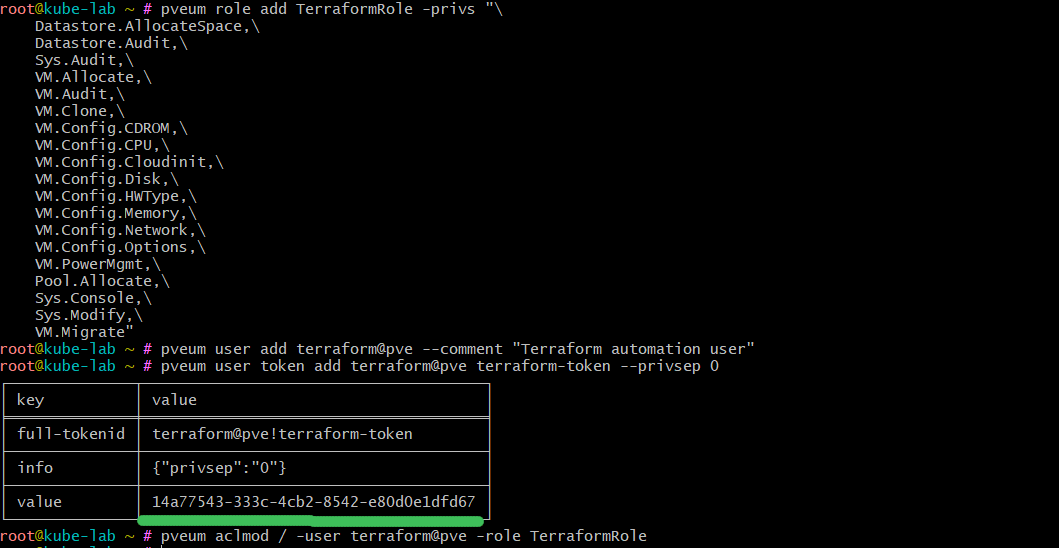
Run this command on the Proxmox host to create a role with required permissions:
pveum role add TerraformRole -privs "\
    Datastore.Allocate,\
    Datastore.AllocateSpace,\
    Datastore.Audit,\
    Sys.Audit,\
    Sys.Modify,\
    Sys.PowerMgmt,\
    VM.Allocate,\
    VM.Audit,\
    VM.Clone,\
    VM.Config.CDROM,\
    VM.Config.Cloudinit,\
    VM.Config.CPU,\
    VM.Config.Disk,\
    VM.Config.HWType,\
    VM.Config.Memory,\
    VM.Config.Network,\
    VM.Config.Options,\
    VM.Migrate,\
    VM.Monitor,\
    VM.PowerMgmt,\
    SDN.Use"
Permission breakdown (for bpg/proxmox):
- Datastore.Allocate, Datastore.AllocateSpace — allow Terraform to create and resize VM disks.
- Datastore.Audit — list available storages (needed for cloning).
- Sys.Audit, Sys.Modify, Sys.PowerMgmt — read system info, modify basic settings, manage power actions.
- VM.Allocate, VM.Audit — create new VMs, list/read VM configuration.
- VM.Clone — clone from a template (our golden image).
- VM.Config.* — full configuration management: attach Cloud-Init, set CPU, memory, disks, NICs, machine type, modify VM metadata (boot order, name, tags).
- VM.Migrate — allow live or cold migration.
- VM.Monitor — monitor VM state (required for bpg provider).
- VM.PowerMgmt — start, stop, reboot VMs.
- SDN.Use — required if you use Proxmox SDN / bridges with bpg provider.
3.2 Create a dedicated user
pveum user add terraform@pve --comment "Terraform automation user"
3.3 Create an API token
pveum user token add terraform@pve terraform-token --privsep 0
--privsep 0disables privilege separation, so the token inherits all rights of its user (in our case only the minimal for TerraformRole we assigned).
This will output a token ID and a secret.
⚠️ Save them carefully — the secret is shown only once.
3.4 Assign the role to the user
pveum aclmod / -user terraform@pve -role TerraformRole
This binds our custom role to the entire Proxmox cluster (/).
Terraform can now use the API to create and manage VMs, but nothing more.
✅ With this setup you now have a dedicated Terraform account that can safely spin up VMs using your golden template.
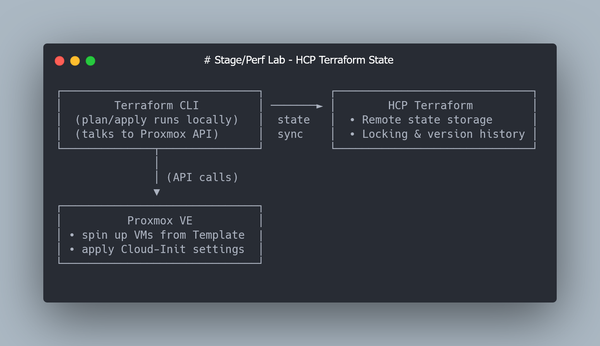
Step 4: Store Terraform State in Terraform Cloud (Free Tier).
By default, Terraform writes its state (terraform.tfstate) locally.
That’s fine for quick experiments, but it has two problems:
- Local state can be lost or corrupted.
- Multiple people (or multiple shells) can’t safely run Terraform at the same time.
HashiCorp offers a free service — Terraform Cloud — which solves both problems.
It stores your state remotely, handles locking automatically, and keeps a full version history.
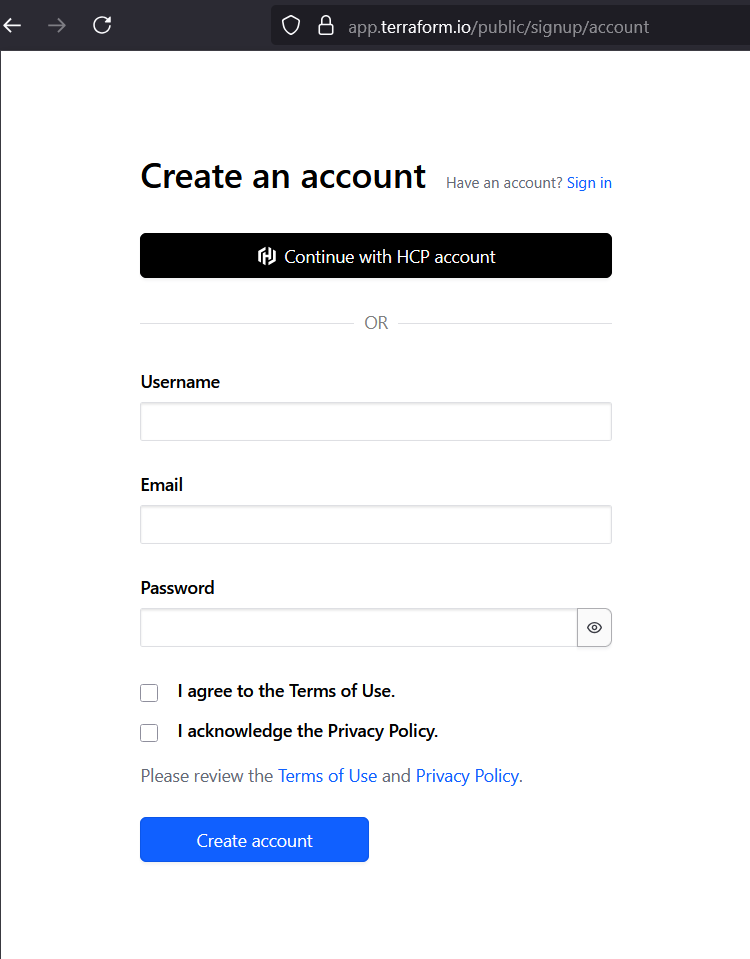
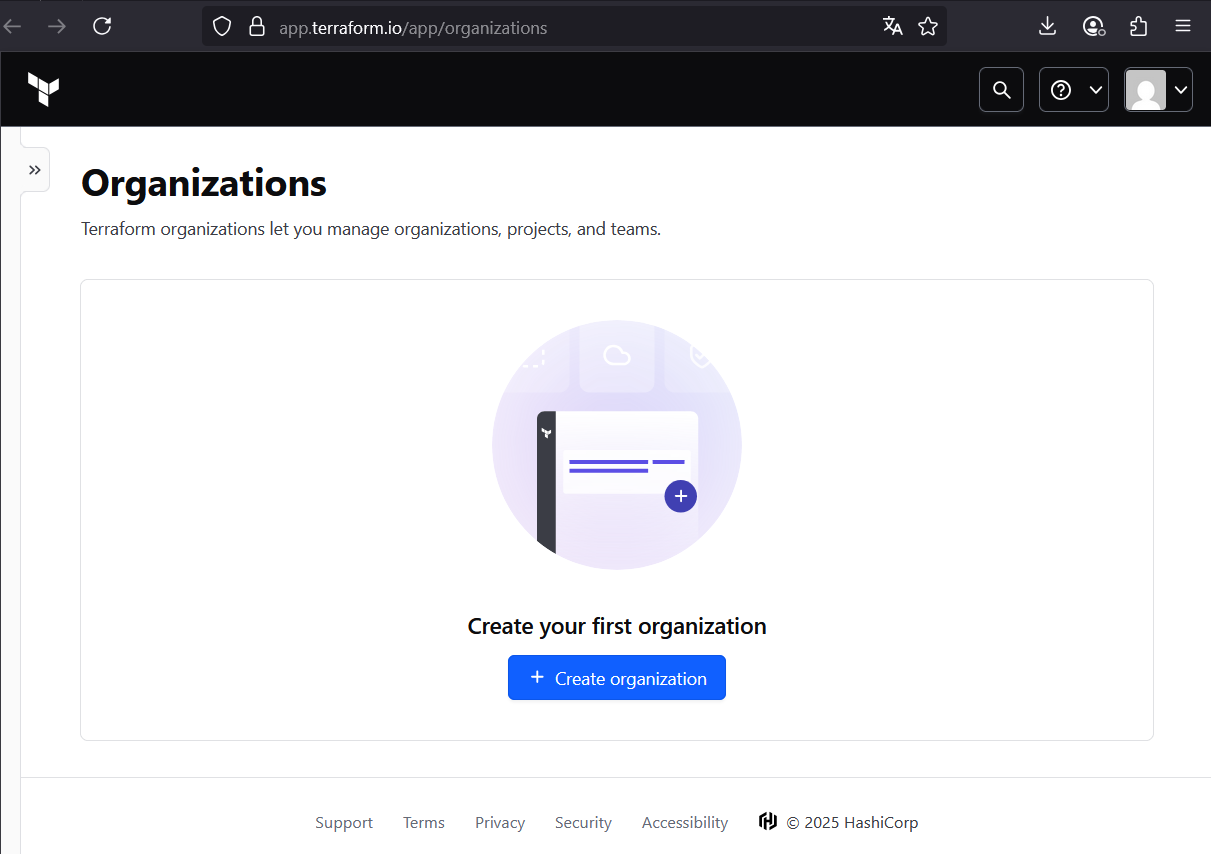
4.1 Register for a free account
Go to Terraform Cloud and create a free account.
The Free tier includes:
- Remote state storage
- State locking
- Version history
- Up to 5 team members
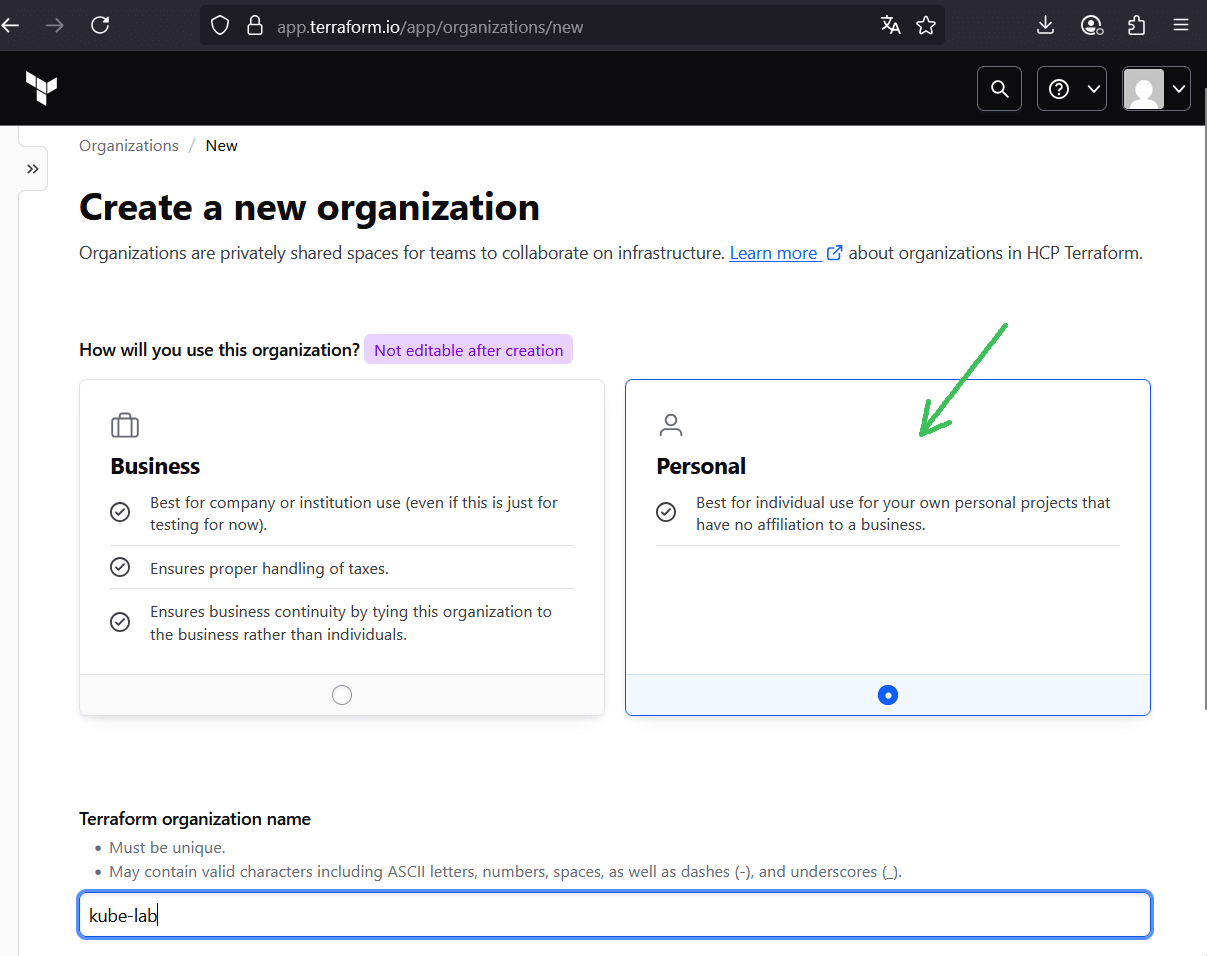
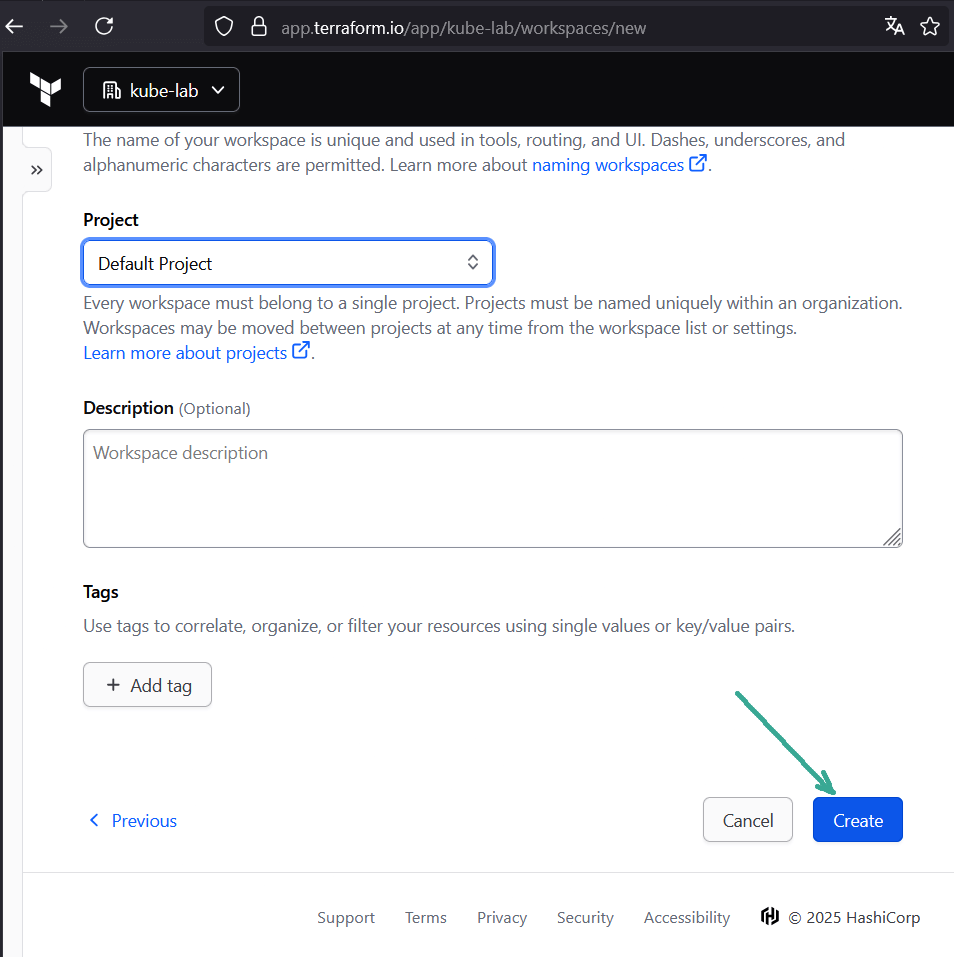
4.2 Create an organization and workspace
- After login, create a new personal organization (e.g.
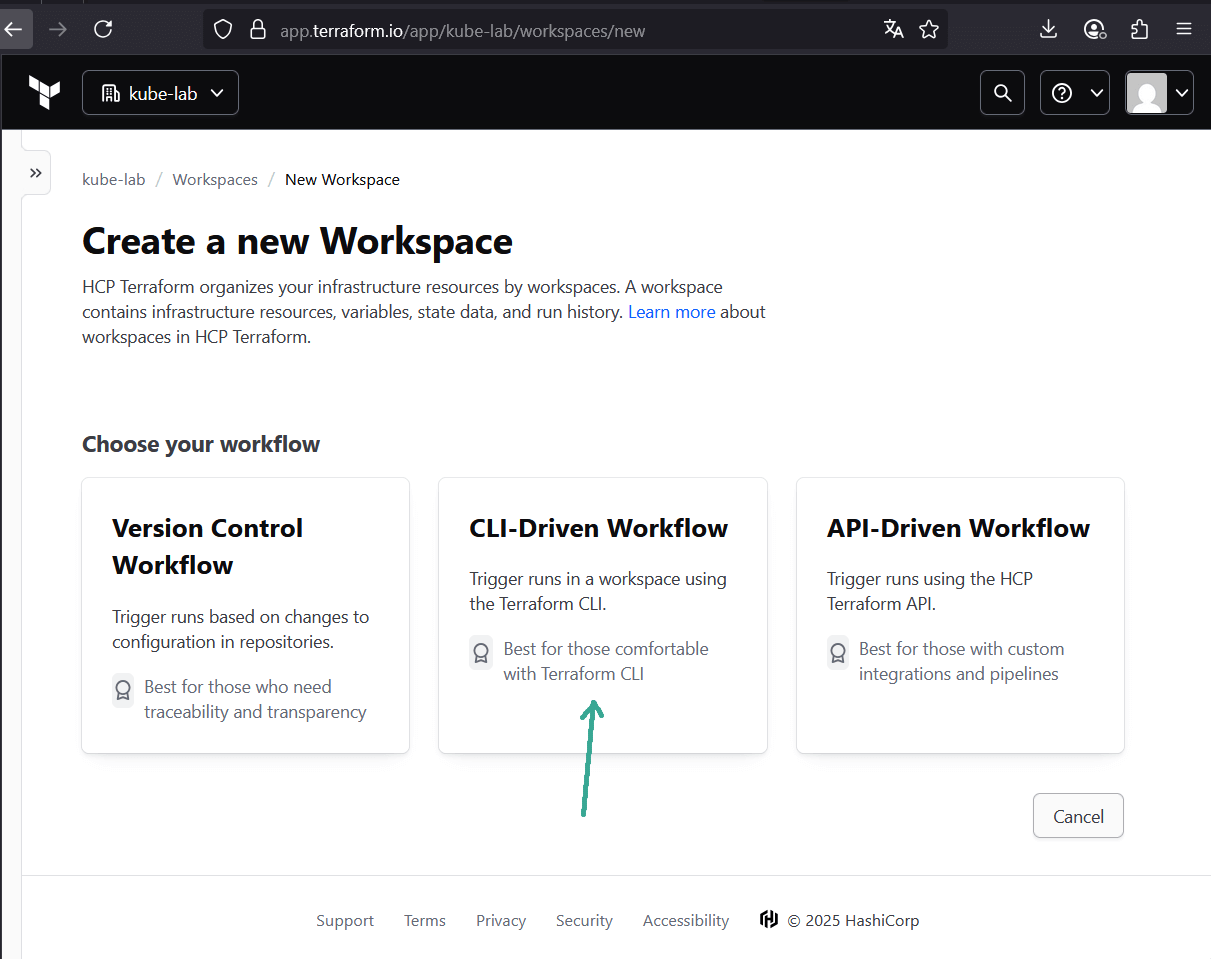
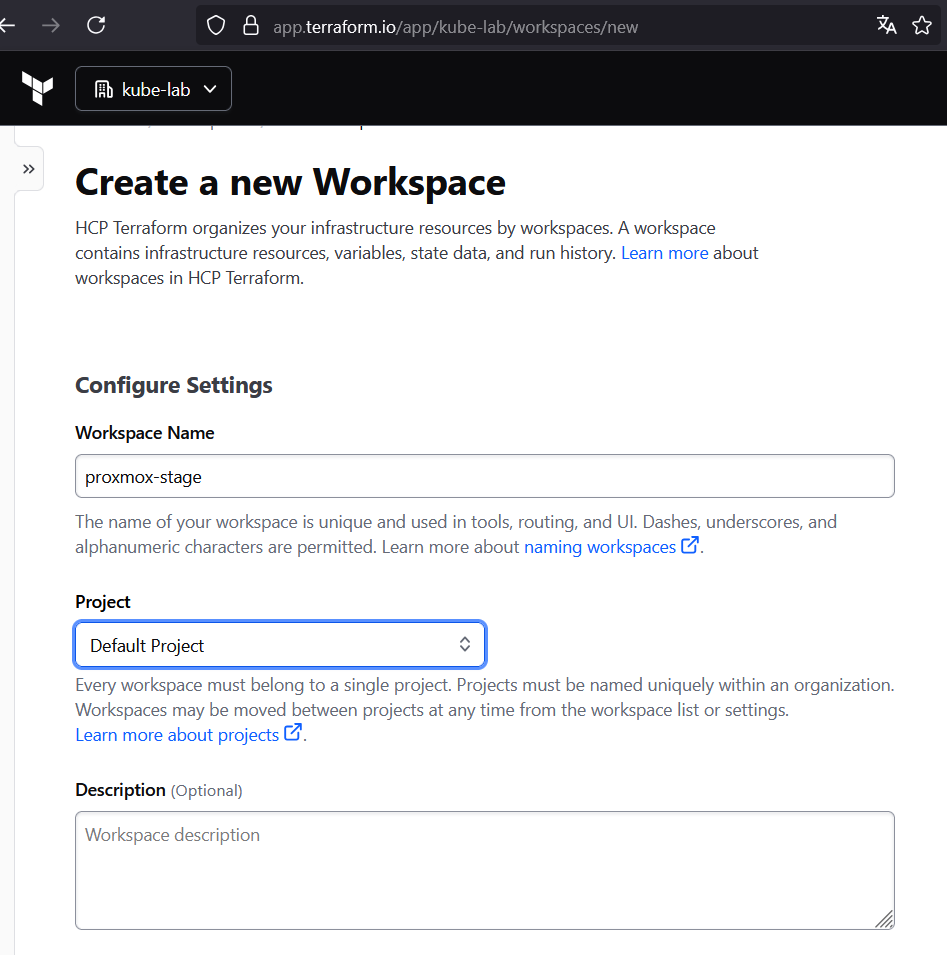
kube-lab). - Inside the org, create a new workspace (e.g.
proxmox-stage). Choose CLI-driven workflow — we’ll run Terraform locally, but state will be remote.
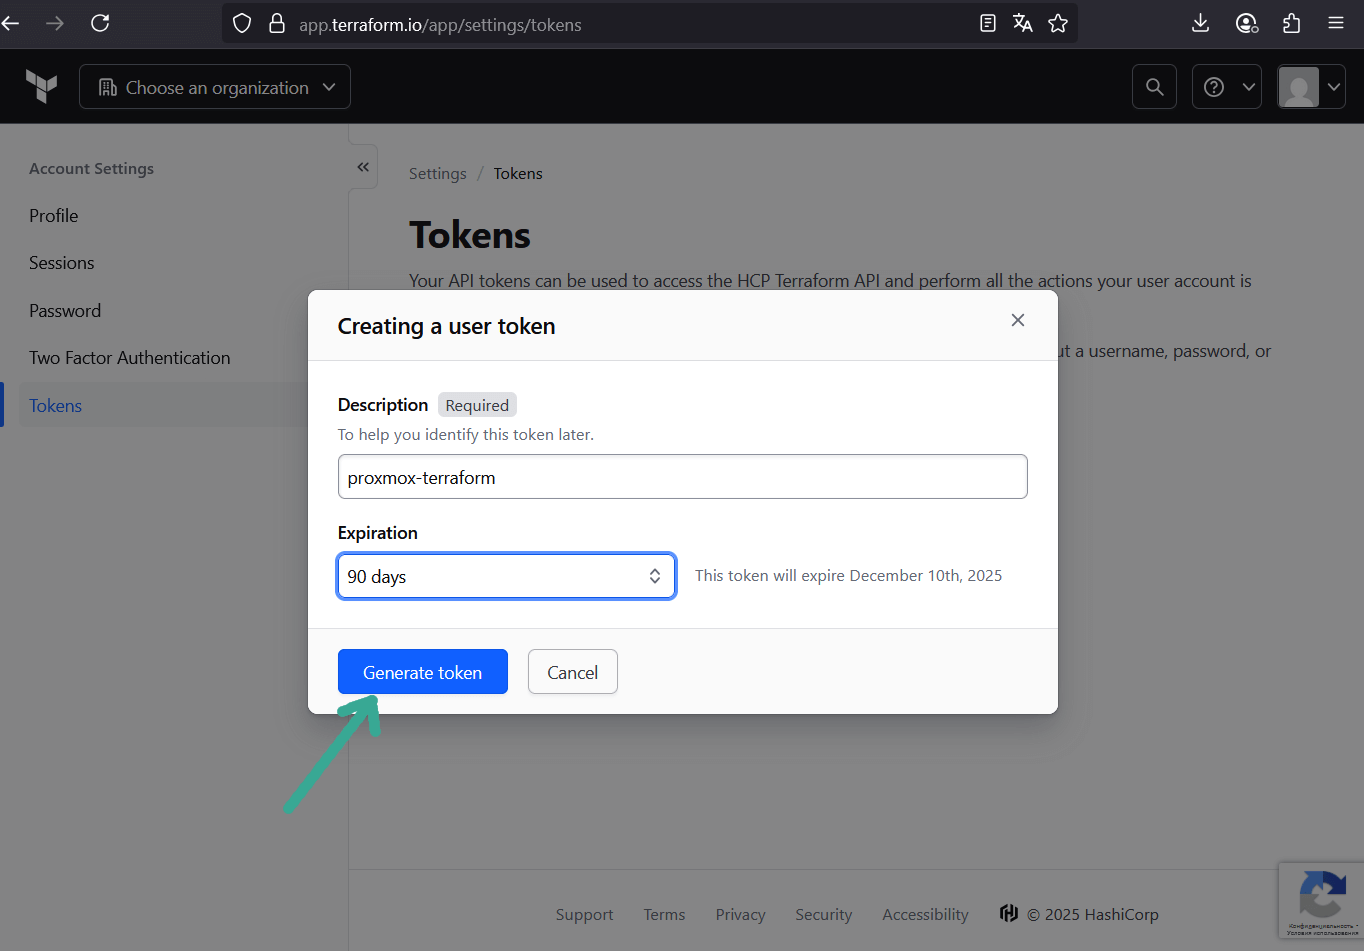
4.3 Generate an API token
In Terraform Cloud UI:
- Go to User Settings → Tokens → Create API token.
- Copy the token — this is your credential for Terraform CLI.
Save it in~/.terraformrc(or~/.terraform.d/credentials.tfrc.json):
credentials "app.terraform.io" {
  token = "YOUR_TERRAFORM_CLOUD_TOKEN"
}


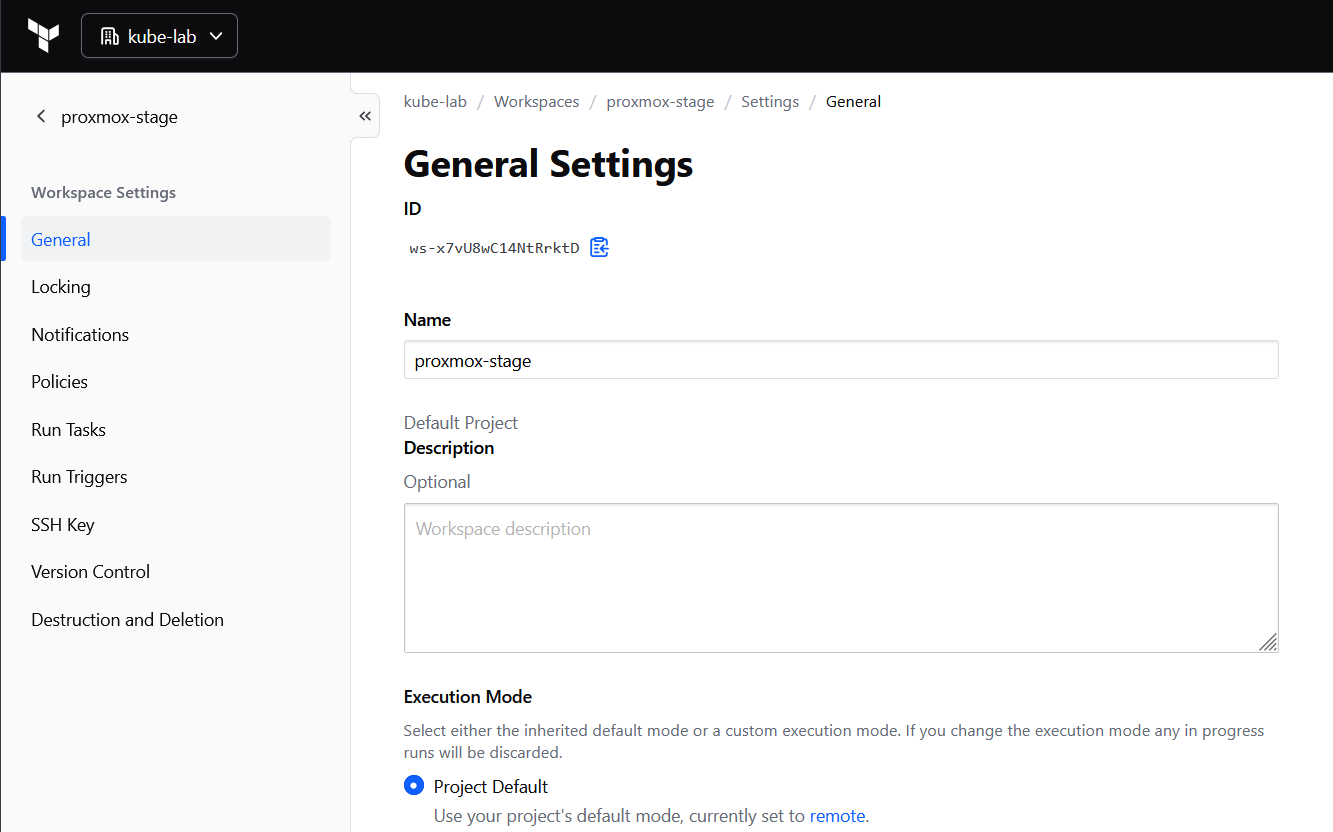
4.4 Make Sure to use Terraform Cloud Only for Remote State
By default, Terraform Cloud workspaces run in remote execution mode. That means plan and apply happen on HashiCorp’s servers — which can’t access your private SSH key we will use to upload a cloud-init snippet via bpg provider.
In Terraform Cloud UI:
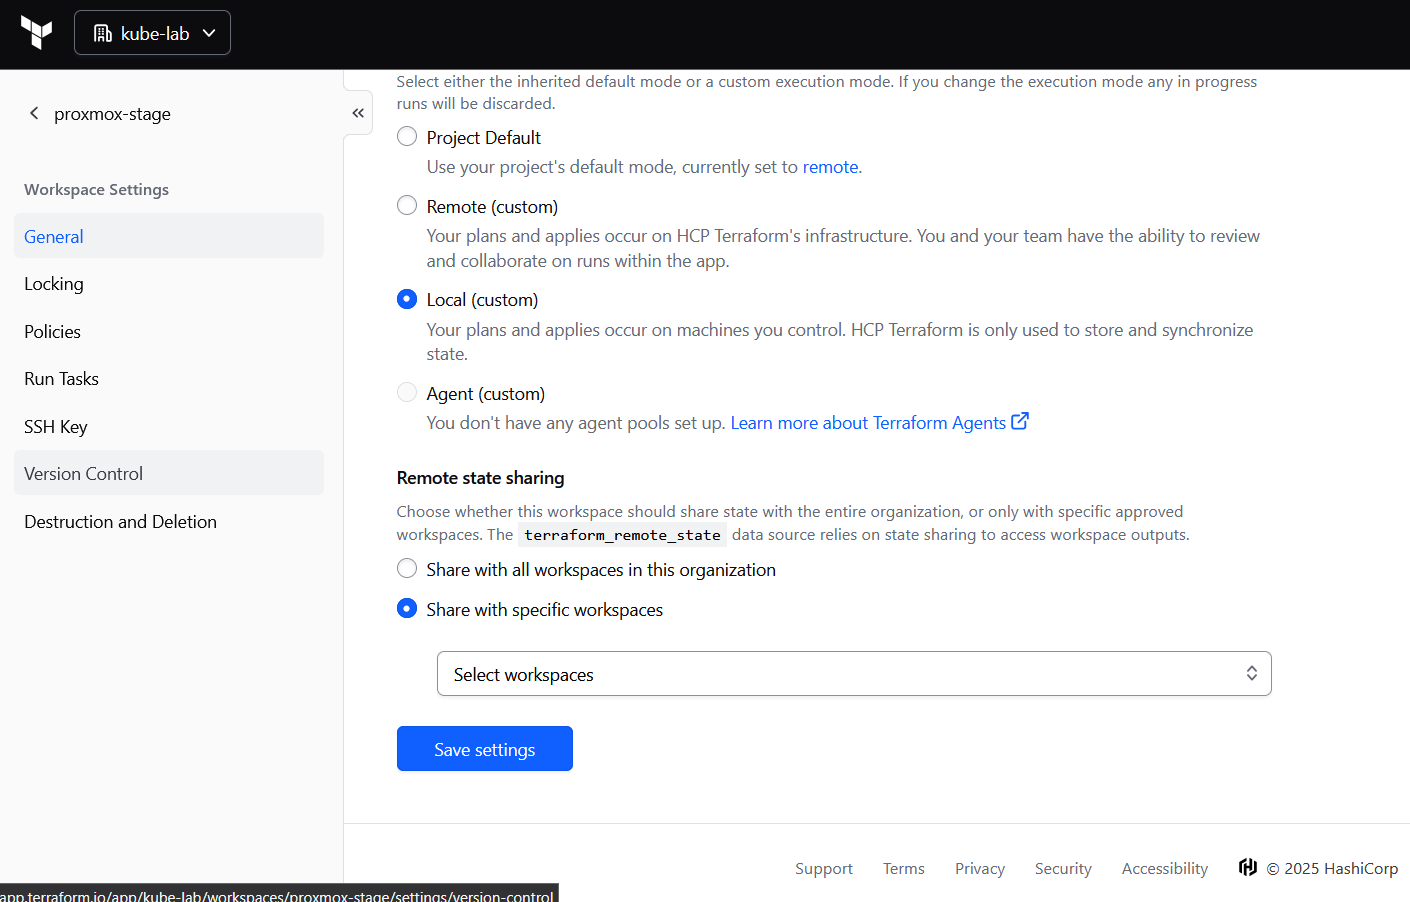
- Go to Workspace → Settings → General
- Set Execution Mode = Local
Step 5: Clone VMs from Template with Terraform (bpg/proxmox provider)
Now that we have a golden template (Ubuntu 22.04 with cloud-init) and a dedicated API user for Terraform, it’s time to actually clone a VM.
Instead of clicking “Clone” in the Proxmox UI, we’ll declare the desired VM state in Terraform. The bpg/proxmox provider will then handle:
- Uploading a cloud-init snippet (user, SSH key, packages, etc.)
- Cloning from the template (VM 9000)
- Resizing disks and assigning CPUs / RAM
- Configuring IPs and DNS
This is the point where our Proxmox box starts behaving like a small private cloud.
5.1 Project structure
Inside a new directory (e.g. terraform), create three files:
- main.tf — settings for remote state management via HashiCorp, bpg provider setup, Proxmox VM resources
- variables.tf — input variables
- terraform.tfvars — your actual values (API token, node name, keys)
5.2 main.tf — Terraform configuration
Here’s a minimal config that:
- connects to your Proxmox API using token
- uploads a
cloud-initsnippet on Proxmox host using ssh key - and clones a VM (
test-ubuntu) from template 9000
terraform {

### Declares that we use remote terraform state management.
    backend "remote" {
        hostname     = "app.terraform.io"
        organization = "kube-lab"

        workspaces {
            name = "proxmox-stage"
        }
    }

    required_providers {
        proxmox = {
            source = "bpg/proxmox"
            version = "0.83.1"
        }
    }
}

### Configure bpg proxmox provider
provider "proxmox" {
    endpoint = var.pm_api_url
    api_token = var.pm_api_token
    insecure = var.pm_tls_insecure

    ### Cloud-init snippets uploaded via ssh connection to Proxmox host
    ssh {
    	agent       = false
    	private_key = file(var.pm_ssh_private_key_path)
  		username    = var.pm_ssh_username
    }
}

# Upload the cloud-init snippet file to the Proxmox datastore
resource "proxmox_virtual_environment_file" "cloud_init_snippet" {
  content_type = "snippets"
  # Define non-lvm datastore id
  datastore_id = var.pm_snippets_datastore_id
  node_name    = var.pm_node_name
  source_raw {
  	data = <<EOF
#cloud-config
hostname: test-ubuntu
timezone: UTC
chpasswd:
  expire: false

users:
  - name: ${var.ci_username}
    groups: sudo
    shell: /bin/bash
    sudo: ALL=(ALL) NOPASSWD:ALL
    lock_passwd: false
    plain_text_passwd: ${var.ci_password}
    ssh_authorized_keys:
      - ${trimspace(var.ci_ssh_public_key)}

# Workaround for bpg Terraform proxmox provider.
# We use ssh auth by login and password for cloud-init by default for tty access from proxmox web console
# and then disable password auth and provide ssh pub key in cloud-init-snippet
write_files:
  - path: /etc/ssh/sshd_config.d/10-no-password.conf
    permissions: '0644'
    content: |
      # Disable password authentication for all SSH connections
      PasswordAuthentication no

package_update: true
package_upgrade: true
packages:
  - qemu-guest-agent
  - net-tools
  - curl
runcmd:
  - systemctl restart sshd
  - systemctl enable qemu-guest-agent
  - systemctl start qemu-guest-agent
  - reboot now

    EOF

    file_name = "cloud_init_snippet.yaml"
  }
}

### Create new vm via cloning from Proxmox template and configure it using Cloud-init
resource "proxmox_virtual_environment_vm" "ubuntu_vm" {
  name        = "test-ubuntu"
  node_name   = var.pm_node_name

  clone {
    vm_id        = 9000
    full         = true
    datastore_id = var.pm_lvm_datastore_id
  }

  bios    = "ovmf"
  machine = "q35"

  description     = "Managed by Terraform"
  started         = true
  stop_on_destroy = true

  cpu {
    cores = 4
    type  = "host"
  }
  memory {
    dedicated = 4096
  }
  agent {
    enabled = true
  }

  # Resize disk
  disk {
    interface    = "scsi0"
    datastore_id = var.pm_lvm_datastore_id
    size         = 20
    iothread     = true
    discard      = "on"
  }

  network_device {
    bridge = "vmbr0"
    model  = "virtio"
  }

  # Define Cloud-init settings
  initialization {
  	user_data_file_id = proxmox_virtual_environment_file.cloud_init_snippet.id

    # Define static ip address and default gateway
    ip_config {
      ipv4 {
        address = "172.16.16.2/24"
        gateway = "172.16.16.1"
      }
    }

    user_account {
      # Workaround for bpg Terraform proxmox provider.
      # We use ssh auth by login and password for cloud-init by default for tty access from proxmox web console
      # and then disable password auth and provide ssh pub key in cloud-init-snippet
      username = var.ci_username
      password = var.ci_password
    }

    dns {
      servers = ["1.1.1.1", "8.8.8.8"]
    }
  }
}
The cloud-init snippet sets the hostname, enables tty login with username/password, installs the QEMU guest agent, then disables SSH password auth, applies package updates/upgrades, and reboots once to activate the new kernel.
5.3 variables.tf — variables definition
variable "pm_api_url" {
  type        = string
  description = "Proxmox API URL (https://<host>:8006/api2/json)"
}

variable "pm_api_token" {
  type        = string
  sensitive   = true
  description = "Proxmox API token ID=secret"
}

variable "pm_ssh_username" {
  type        = string
  default     = "root"
}

variable "pm_ssh_private_key_path" {
  type        = string
  default     = "~/.ssh/id_rsa"
}

variable "pm_tls_insecure" {
  type    = bool
  default = true
}

variable "pm_node_name" {
  type    = string
  default = "kube-lab"
}

variable "pm_lvm_datastore_id" {
  type    = string
  default = "local-lvm"
}

variable "pm_snippets_datastore_id" {
  type    = string
  default = "local"
}

variable "ci_username" {
  type        = string
  description = "Cloud-init default user"
}

variable "ci_password" {
  type      = string
  sensitive = true
}

variable "ci_ssh_public_key" {
  type        = string
  description = "SSH public key"
}
5.4 terraform.tfvars — actual values
Point to your actual proxmox server and replace SECRET with the token you've got from step 3.3, adjust username, password and ssh public key for new VM:
pm_api_url              = "https://<your-proxmox>:8006/api2/json"
pm_api_token            = "terraform@pve!terraform-token=SECRET"
pm_node_name            = "kube-lab"
ci_username             = "ubuntu"
ci_password             = "changeme"
ci_ssh_public_key       = "ssh-ed25519 AAAA..."
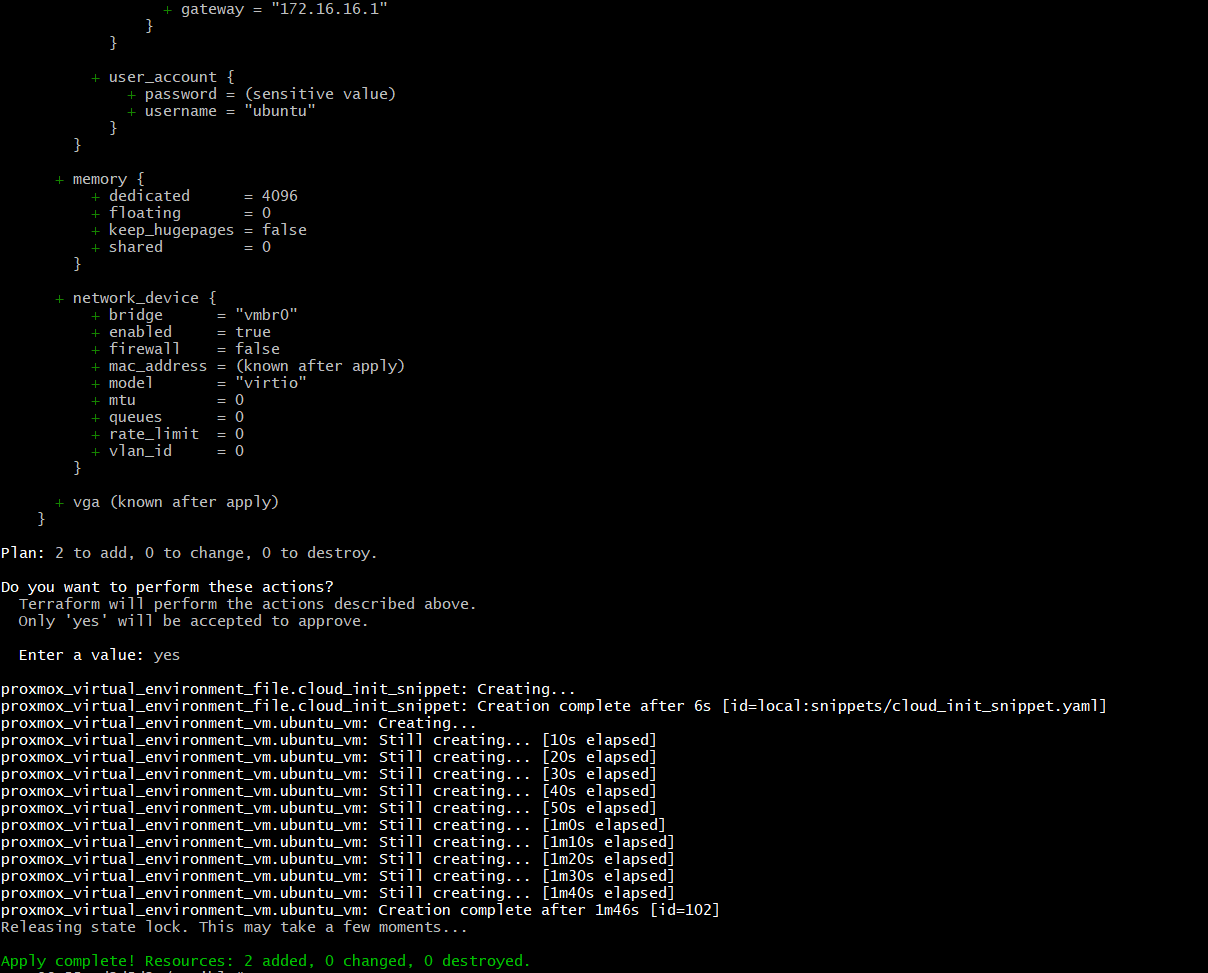
5.5 Running Terraform
terraform init
terraform plan -out first_vm
terraform apply "first_vm"
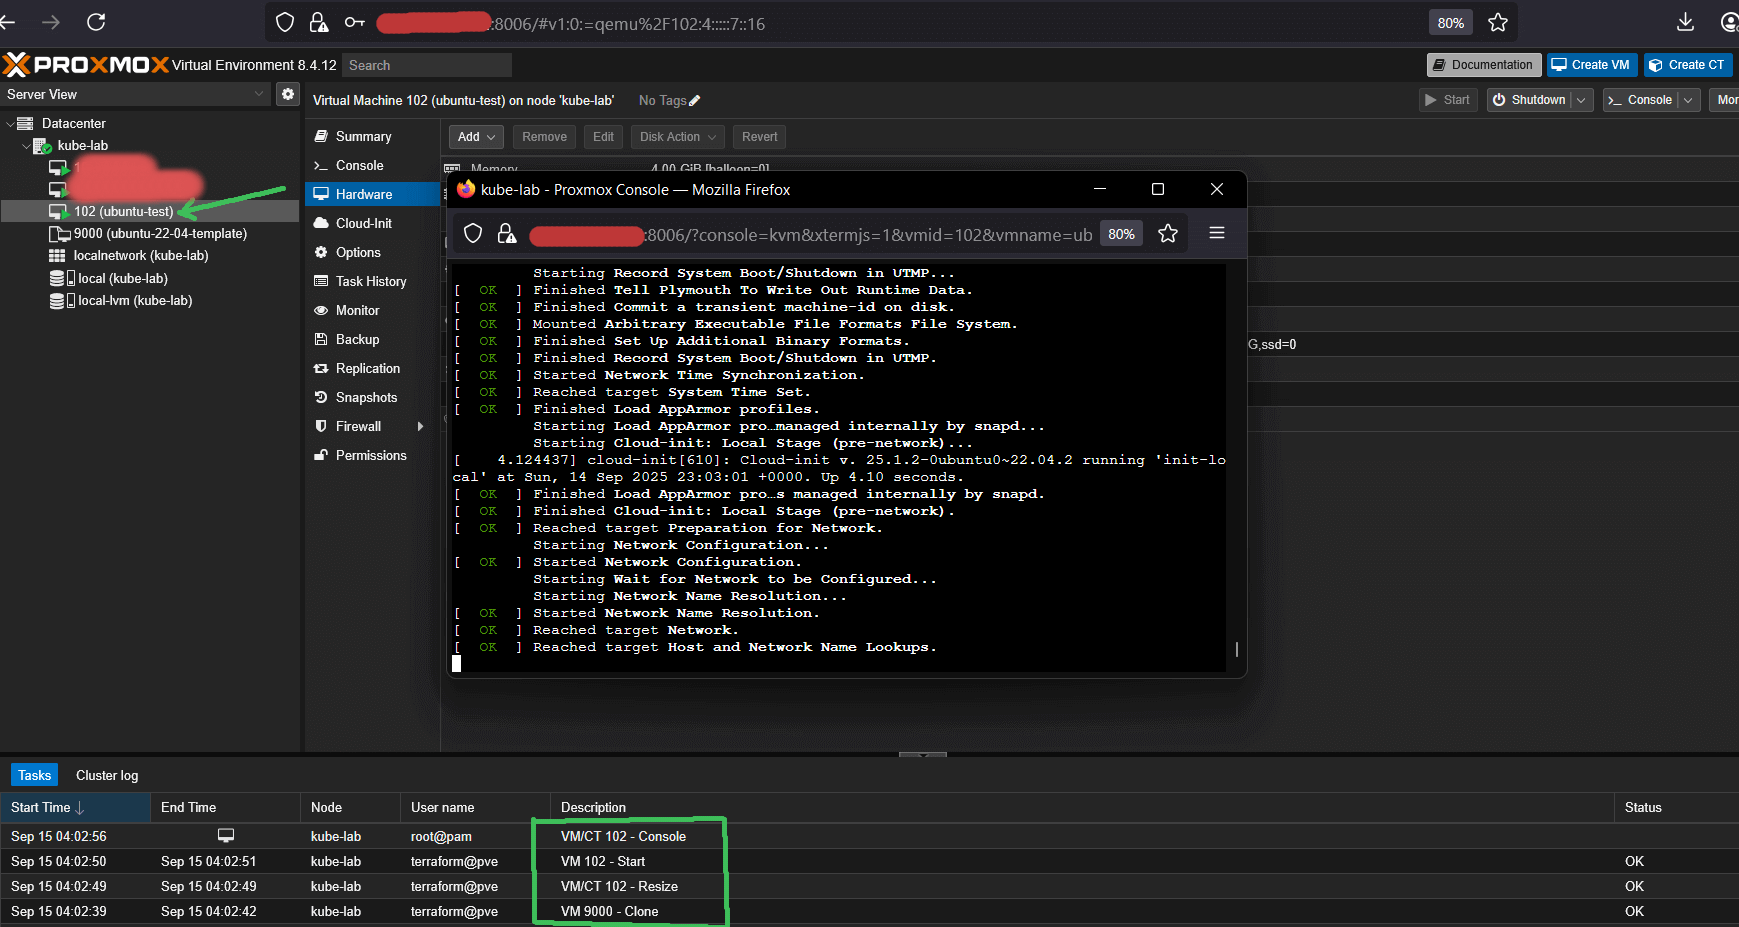
After a few minutes, you should see your first VM booted, configured via cloud-init, and accessible from Proxmox host via SSH using your public key.
What’s Next & How to Automate It
At this point we have a golden Ubuntu 22.04 Cloud-Init template in Proxmox, a dedicated Terraform user with API token, and a working Terraform setup that can clone VMs declaratively. The environment is now ready to spin up Kubernetes nodes.
➜ In the next article, we’ll scale this setup to multiple VMs (control plane + workers) and provision a full Kubernetes cluster with Kubespray.
ℹ️ Don’t want to manually repeat all the Proxmox setup steps? I've updated github repo with:
- a Terraform example that uploads a cloud-init snippet, clones from a Proxmox template, and configures CPU, RAM, disk, IPs, and SSH keys;
- and an extended Ansible role (from Part 1), now also automating template creation, Terraform user/role, and API token provisioning.
With these, you can go from a bare Hetzner server to a ready-to-SSH Ubuntu VM template managed by Terraform in about 10 minutes.
💡 If you found this guide useful, follow me on LinkedIn — I regularly share deep-dive content on Kubernetes, Proxmox, and real-world performance engineering.