How to Create a Proxmox VM Template with Ubuntu 22.04 Cloud-Init
Step 0: Downloading the Official Ubuntu Cloud Image (22.04)
Instead of installing Ubuntu from an ISO, we’ll use the official Ubuntu Cloud Image. These images are optimized for automation and are the same base used in AWS, Azure, and GCP.
SSH into the Proxmox host and download the latest Jammy (22.04) image:
cd /var/lib/vz/template/iso
wget -c https://cloud-images.ubuntu.com/jammy/current/jammy-server-cloudimg-amd64.img
mv jammy-server-cloudimg-amd64.img ubuntu-22.04-cloudinit.img
This .img file is preconfigured to work with cloud-init, which will later inject SSH keys, hostnames, and network settings into our cloned VMs.
Step 2: Import the Cloud Image and Create a VM Template
Now that we’ve downloaded the official Ubuntu 22.04 cloud image, let’s turn it into a reusable VM template.
What’s a template in Proxmox?
A template is a special kind of VM that can’t be started directly — instead, you clone it into real VMs. This allows you to:
- Create multiple identical machines (control plane / worker nodes)
- Use Terraform or qm clone without redoing setup each time
- Avoid boot errors from duplicated disk UUIDs or hostnames
Think of it as your golden image — configured once, then reused across the cluster. Let's create one.
This time we will using q35 + UEFI, which is the modern baseline for most cloud environments.
Why q35 + UEFI?
- q35 emulates a modern Intel chipset with PCIe support (better device compatibility).
- UEFI (OVMF) is closer to how VMs boot in AWS, Azure, and GCP.
- Legacy i440fx works fine, but q35 + UEFI is more future-proof for cloud-init–based templates.
2.1 Create a minimal placeholder VM
We start by creating a placeholder VM with q35 machine type and UEFI BIOS (OVMF). We also add a small EFI disk to store UEFI variables.:
qm create 9000 \
  --name ubuntu-22-04-template \
  --memory 2048 \
  --cores 2 \
  --machine q35 \
  --bios ovmf \
  --efidisk0 local-lvm:0,pre-enrolled-keys=1 \
  --net0 virtio,bridge=vmbr0
9000- VM ID (you can choose any unused number)--name— logical name shown in the Proxmox UI--memoryand--cores— minimal specs for the template--machine q35— enables modern PCIe-based machine type.--bios ovmf— tells Proxmox to use UEFI firmware.--efidisk0 local-lvm:0,pre-enrolled-keys=1— adds a tiny EFI disk to save firmware variables and Secure Boot keys.--net0— attaches a virtio network interface to your bridge (vmbr0)
ℹ️ What is EFI/UEFI and why do we need efidisk0?
When you switch a VM to q35 + UEFI (OVMF), Proxmox emulates modern UEFI firmware instead of old Legacy BIOS.
Unlike BIOS, UEFI needs a small persistent disk to store firmware variables (boot order, Secure Boot keys, etc.). That’s why we add an EFI Disk (efidisk0).
- UEFI vs BIOS
- BIOS boots from the first 512 bytes of a disk (MBR).
- UEFI boots from a dedicated EFI System Partition (ESP) and supports GPT disks, PCIe devices, and modern drivers.
- EFI disk (
efidisk0)- A tiny virtual disk created by Proxmox.
- Stores UEFI settings for that VM, so they survive reboots.
- Without it, the VM behaves as if you “pulled the BIOS battery” on every boot.
pre-enrolled-keys=1- Refers to Secure Boot. With this option, Proxmox preloads standard vendor keys (Microsoft, Ubuntu, Red Hat).
- Useful if you want to enforce Secure Boot.
- For DevOps labs and Kubernetes clusters, you usually don’t need this, so you can just run:
qm set 9000 --efidisk0 local-lvm:0
BIOS vs UEFI (quick comparison)
| Feature | Legacy BIOS (i440fx) | UEFI (q35 + OVMF) |
|---|---|---|
| Boot method | Reads first 512 bytes (MBR) | Loads EFI bootloader from ESP |
| Disk support | Up to 2 TB (MBR) | GPT, many TBs+ |
| Device model | Old PCI bus | Modern PCIe bus |
| VM compatibility | Works with almost anything | Needed for modern cloud images |
| Boot config persistence | Stored in firmware only | Stored on EFI disk (efidisk0) |
| Secure Boot | Not available | Supported (with vendor keys) |
| Best use cases | Legacy OS, maximum stability | Modern Linux/Windows, cloud-init |
2.2 Import the cloud image to LVM
qm importdisk 9000 ubuntu-22.04-cloudinit.img local-lvm
This command takes the downloaded Ubuntu qcow2 cloud image and imports it into your local-lvm storage.
- The qcow2 file is unpacked and converted into a raw logical volume (LV).
- That volume is now tied to VM 9000, but not yet attached as a usable disk.
💡 In other words: this step puts the OS image into your Proxmox storage, so the VM can boot from it later. Until you attach it, it just sits there as an “unused disk.”
2.3 Attach the disk as boot volume
qm set 9000 --scsihw virtio-scsi-single --scsi0 local-lvm:vm-9000-disk-1
This tells Proxmox:
--scsihw virtio-scsi-single- use the single-controller mode of virtio-scsi, where each disk gets its own controller.- This improves parallel I/O performance.
- Allows enabling
iothread=truefor each disk. - Recommended for databases, Kubernetes PV workloads, and high-IO applications.
--scsi0 local-lvm:vm-9000-disk-1— attach the imported raw disk as the VM’s primary boot device.
💡 After this step, VM 9000 now has a proper root disk with Ubuntu installed, ready to boot.
2.4 Add cloud-init drive
This is the special drive that cloud-init reads on first boot (for injecting SSH keys, hostname, user config, etc.):
qm set 9000 --ide2 local-lvm:cloudinit
qm set 9000 --serial0 socket --vga serial0
- Cloud-init must be attached as ide2
- The
serial0settings allow you to view logs during boot (over serial console)
How the Cloud-Init disk works
When you attach local-lvm:cloudinit, Proxmox generates a tiny virtual disk with your VM’s metadata (SSH keys, hostname, network settings). On the first boot, Ubuntu reads this disk and applies the configuration.
Think of it as a companion to the main OS image:
               ┌─────────────────────────┐
               │        VM (ID 9000)     │
               │                         │
               │  ┌───────────────┐      │
               │  │ Boot Disk     │      │
               │  │ (Ubuntu 22.04 │      │
               │  │  Cloud Image) │      │
               │  └───────────────┘      │
               │                         │
               │  ┌───────────────┐      │
               │  │ Cloud-Init    │      │
               │  │ Disk          │      │
               │  │ (SSH key,     │      │
               │  │ hostname, net │      │
               │  │ config)       │      │
               │  └───────────────┘      │
               │                         │
               └─────────────────────────┘
💡 Without this extra disk, Ubuntu wouldn’t know which SSH key or network settings to use after cloning.
2.5 Set the boot order
By default, Proxmox may try to boot from the Cloud-Init disk first — which won’t work, because it only contains metadata (SSH keys, hostname, network settings). We need to make sure the Ubuntu image (scsi0) is the first boot device.
qm set 9000 --boot order=scsi0
This ensures:
- scsi0 - Ubuntu OS image (root disk) is the first boot device.
- ide2 - Cloud-Init metadata disk remains attached, but will not be used for boot.
💡 Without this setting, the VM may show “No bootable device” at startup, because it’s trying to boot from the Cloud-Init disk instead of the actual OS.
2.6 (Optional) Enable QEMU Guest Agent
This improves integration with the VM (e.g. IP reporting, shutdown, file copy):
qm set 9000 --agent enabled=1
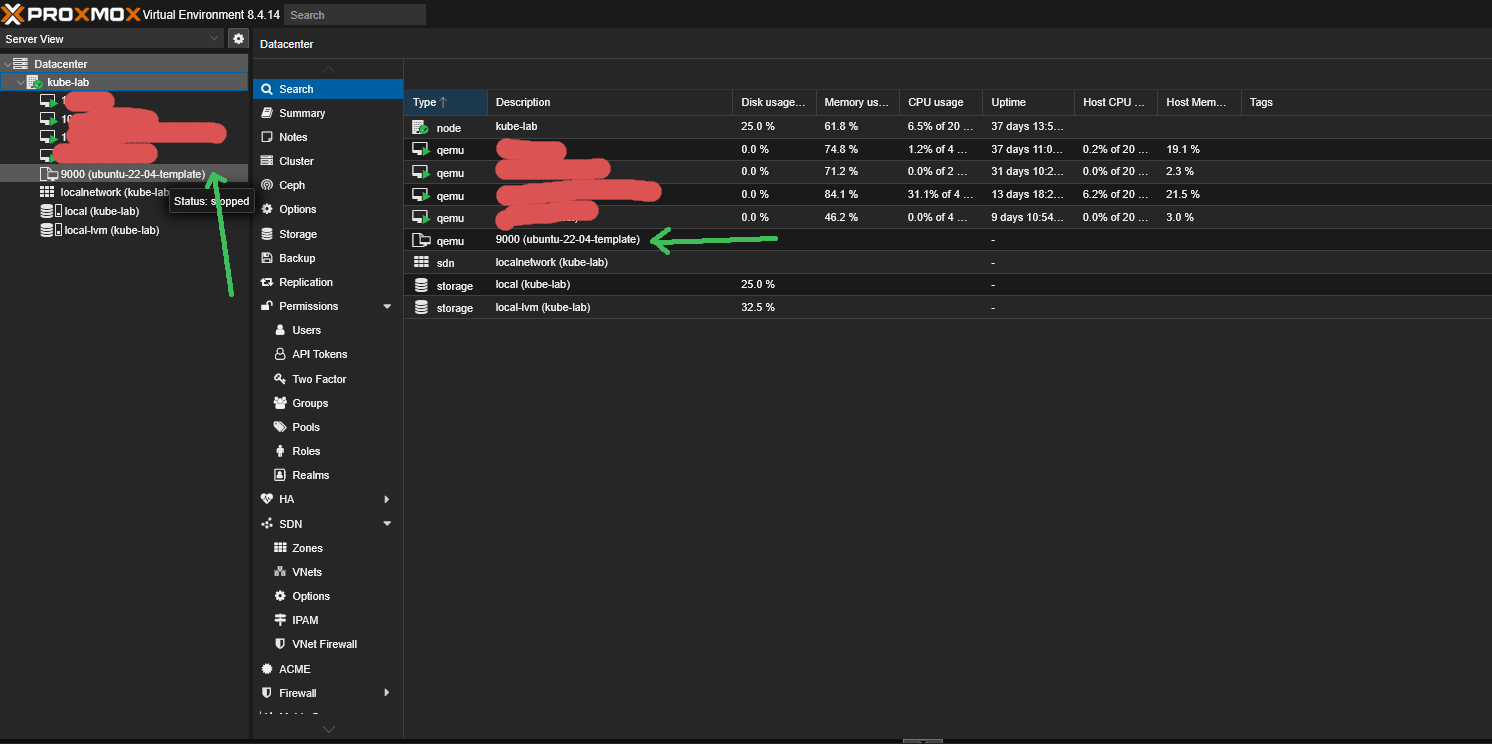
2.7 Convert VM to template
This is the key step — instead of being a regular VM, this will become a reusable image:
qm template 9000
Once converted, this template can’t be started — only cloned.
💡 Tip for manual clones
The official Ubuntu Cloud Image has a virtual root disk size of ~2–2.3 GB.
The downloaded qcow2 file looks smaller (~600–700 MB) because it’s compressed, but after you run qm importdisk, Proxmox expands it into a raw LV of about 2.2 GB.
That’s enough to boot, but often too small if cloud-init tries to run apt upgrade on the first boot.
If you’re cloning a VM manually from this template (not via Terraform), resize the root disk before the first boot:
qm resize <VMID> scsi0 20G
Ubuntu’s cloud-init (growpart) will automatically expand the filesystem to fill the new disk size on first boot.
Now this template is ready to be cloned either manually or via Terraform.