Proxmox + Terraform: Automatically Creating Kubespray-Ready VMs with Cloud-Init

(64GB RAM Kubernetes Cluster for €39/month — Part 3)
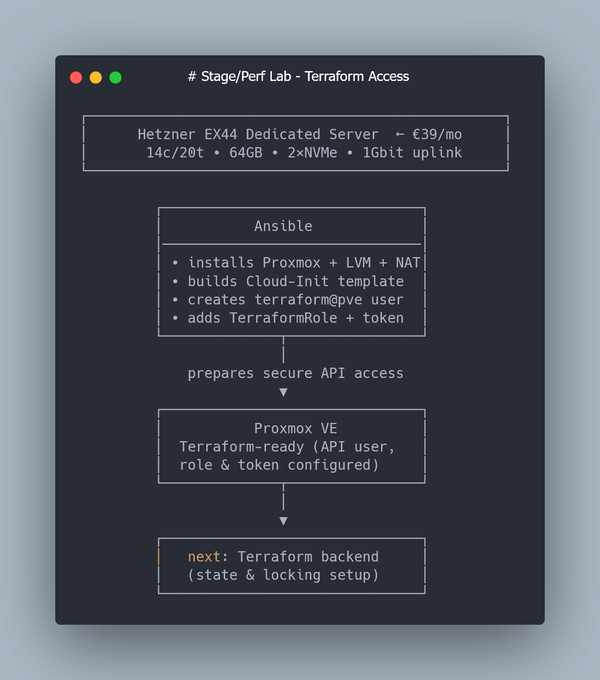
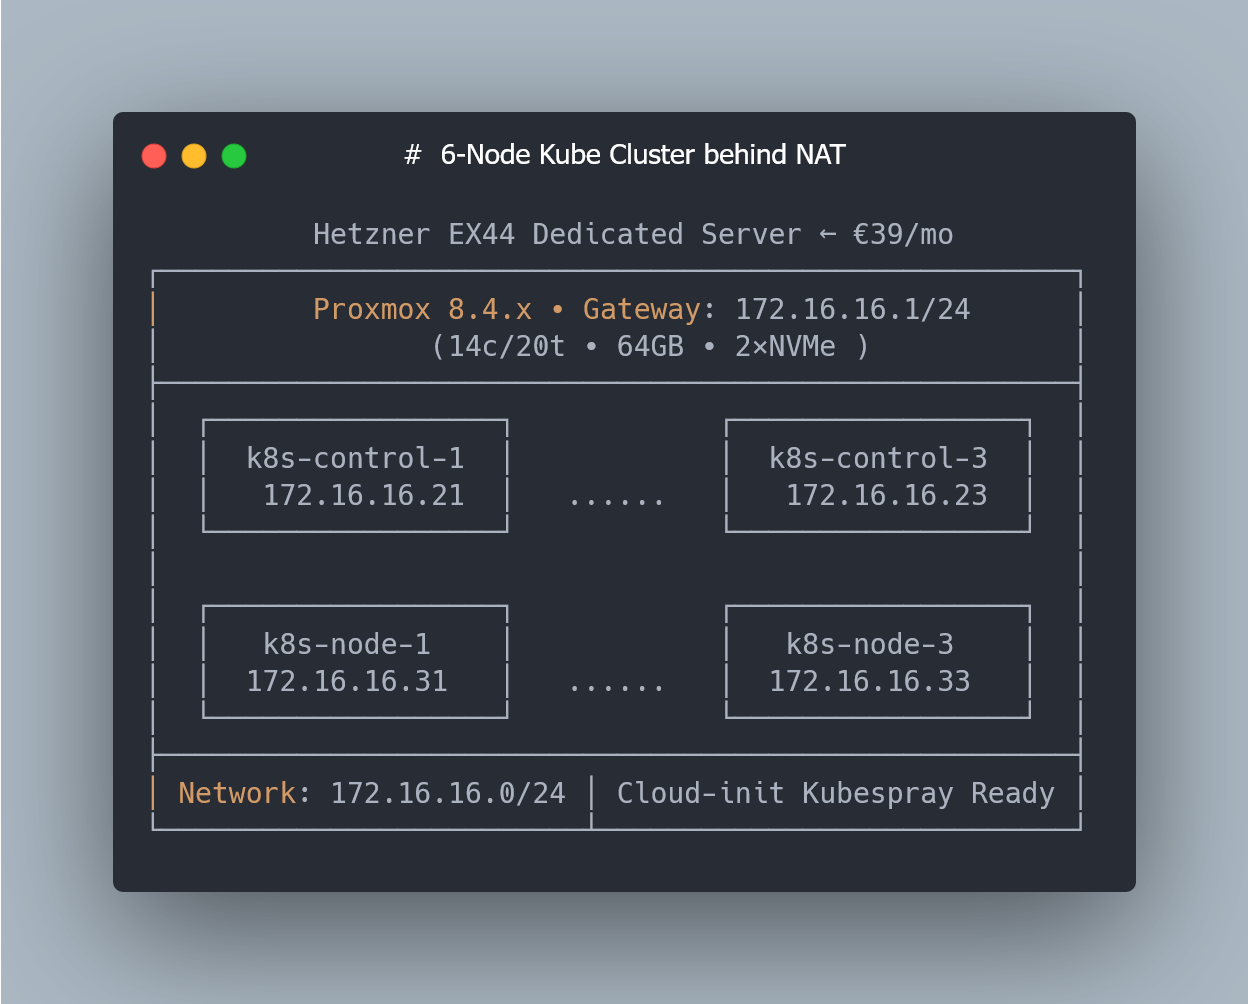
This is Part 3 of a multi-part series on building a Kubernetes homelab / stage environment with Proxmox on a Hetzner EX44 (14c/20t, 64 GB RAM) dedicated server.
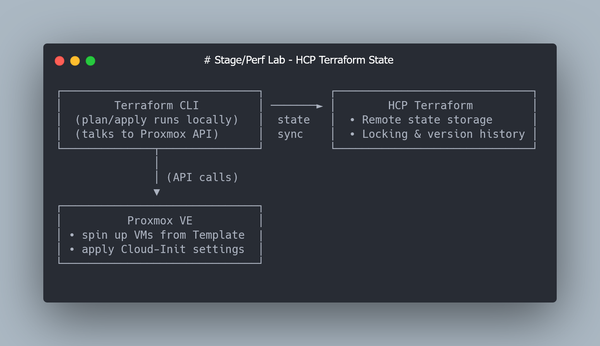
In Part 2, we created a Proxmox VM Template based on Ubuntu 22.04 (q35 + UEFI, Cloud-Init enabled), set up a dedicated Proxmox API user, enabled Terraform Cloud for remote state, and used Terraform together with the bpg/proxmox provider to clone a single Ubuntu VM automatically.
No Kubernetes yet — just a clean VM provisioned declaratively.
Now it’s time to scale this setup from one VM to a six-node layout and refine the Cloud-Init configuration so that every VM boots in a Kubespray-ready state.
Before we continue, I want to highlight an issue that appeared when I tried to create multiple VMs at once — a persistent “Still creating…” hang in Terraform and intermittent state drift — and how I eventually solved it.
Terraform "Still creating…" and State Drift: What Actually Happened
When I scaled from one VM to six, Terraform started acting inconsistently.
Sometimes all VMs were created successfully.
Sometimes it hung indefinitely with “Still creating…”.
Sometimes I ended up with half-created resources left behind in Proxmox after terraform apply.
At first, I assumed this was some kind of race condition in the Proxmox API or inside the bpg/proxmox provider. As a quick test, I tried lowering Terraform’s parallelism:
terraform apply -auto-approve -parallelism=1 "k8s"
It helped for a while… and then the issue came back.
The interesting part was this: in several failed runs, the VM was successfully created on the Proxmox side — Terraform simply lost connection mid-operation and kept waiting at “Still creating…”.
So I started suspecting a connectivity issue between the provider and the Proxmox API.
To verify that, I checked the RTT from my laptop to the Hetzner EX44 node:
mtr -c 200 -r <your_hetzner_dedicated_ip>
-c 200— run 200 probes-r— output results in a report-friendly mode (non-interactive)
This gives a clear, reproducible snapshot of network stability and RTT spikes between your machine and the Proxmox host.
And in my case, the numbers were… surprising:
Worst RTT 67ms
Average RTT: ~1.5ms
So most of the time the connection was extremely fast — but occasionally there were huge spikes.
I don’t know the internals of the bpg/proxmox provider, but the RTT spikes clearly caused API timeouts. Running Terraform from a Hetzner Cloud VM in the same DC fixed the issue instantly, even without -parallelism=1.
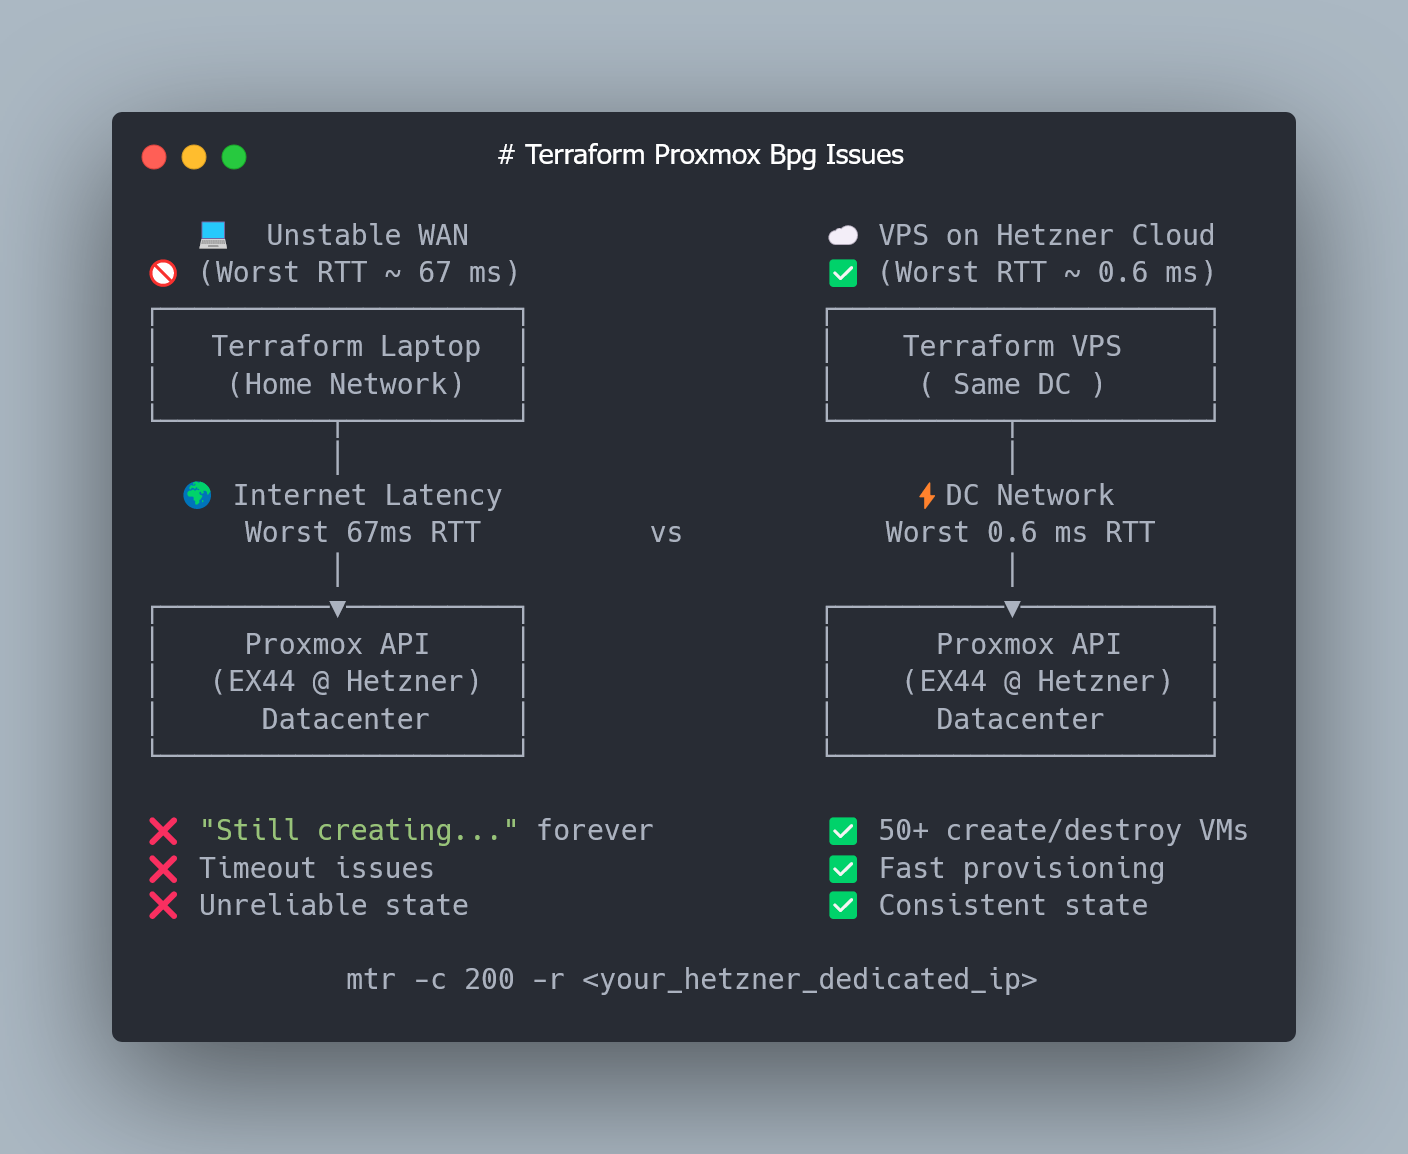
So, if you don’t want to deal with inconsistent Terraform runs, I strongly recommend running the next steps from a Hetzner Cloud VM in the same datacenter.
Scaling from One VM to a Six-Node Cluster (3 Masters + 3 Workers)
Cloud-Init: Making Each Node Kubespray-Ready
We’re going to take the cloud-init snippet from Part 2 and rebuild it a bit.
First, let’s move all cloud-init related config into a separate Terraform template file — it makes the setup cleaner and easier to scale. Create terraform/templates/cloud-init-base.tftpl with the following content:
#cloud-config
hostname: ${hostname}
timezone: UTC
chpasswd:
  expire: false

users:
  - name: ${username}
    groups: sudo
    shell: /bin/bash
    sudo: ALL=(ALL) NOPASSWD:ALL
    lock_passwd: false
    plain_text_passwd: ${password}
    ssh_authorized_keys:
      - ${ssh_public_key}

# Workaround for bpg Terraform proxmox provider.
# We use ssh auth by login and password for cloud-init by default for tty access from proxmox web console
# and then disable password auth and provide ssh pub key in cloud-init-snippet
write_files:
  - path: /etc/ssh/sshd_config.d/10-no-password.conf
    permissions: '0644'
    content: |
      # Disable password authentication for all SSH connections
      PasswordAuthentication no

package_update: true
package_upgrade: true
packages:
  - qemu-guest-agent
  - net-tools
  - curl
  # Mitigate Ubuntu Cloud Img python3 missing
  - python3
  - python-is-python3
runcmd:
  - systemctl restart sshd
  - systemctl enable qemu-guest-agent
  - systemctl start qemu-guest-agent
%{ if enable_k8s }
  # Ensures persistence after reboot
  - echo 'br_netfilter' > /etc/modules-load.d/k8s.conf
  # Loads the module immediately for the current session
  - modprobe br_netfilter
  - sysctl -w net.ipv4.ip_forward=1
  - echo 1 > /proc/sys/net/bridge/bridge-nf-call-iptables
  - swapoff -a
  - sed -i '/ swap / s/^/#/' /etc/fstab
%{ endif }

power_state:
  mode: reboot
  condition: true
Now, compared to the original cloud-init snippet from Part 2, we added a missing python3 package (for some reason the Ubuntu Cloud Image doesn’t ship it by default) and a few Kubernetes-specific settings to make each node ready for Kubespray provisioning.
Let's take a closer look at Kubernetes specific part of Cloud-init template:
modprobe br_netfilter- loads the br_netfilter kernel module, allowing Linux to apply iptables/nftables rules to traffic passing through bridge interfaces. Without it, some pod traffic in Kubernetes may bypass filtering and cause networking issues.echo 'br_netfilter' > /etc/modules-load.d/k8s.conf- Registers the br_netfilter module to be loaded automatically on every boot.sysctl -w net.ipv4.ip_forward=1- Enables IP forwarding so the node can route pod and service traffic.echo 1 > /proc/sys/net/bridge/bridge-nf-call-iptables- Tells the kernel to pass bridged traffic through iptables, ensuring Kubernetes can correctly apply network policies and service routing rules.swapoff -a- Disables swap immediately. Kubernetes won’t start kubelet unless swap is turned off.sed -i '/ swap / s/^/#/' /etc/fstab- Comments out swap entries in fstab to keep swap permanently disabled after reboot.
ℹ️ What is Linux bridge interfaces and why do we need them?
A Linux bridge is basically a tiny virtual switch living inside the kernel. Kubernetes uses it to wire up pod network interfaces on the same node so they can talk to each other without any magic. Think of it as a local hub: pods plug in, exchange traffic, and only then — if needed — traffic leaves the node and goes to the rest of the cluster.
Now let’s generate our 3 control planes and 3 worker nodes via Terraform.
Terraform: Creating 3 Control Planes and 3 Workers Automatically
Let’s start by defining the local variables describing our future Kubernetes layout:
# ---------- LOCALS ----------
locals {
  # Base network configuration
  network_cidr       = "172.16.16.0/24"
  network_mask       = 24
  # Generates "172.16.16.1" address in our case
  network_gateway_ip = cidrhost(local.network_cidr, 1)

  # IP offsets inside the subnet
  control_plane_ip_offset = 20
  worker_ip_offset        = 30

  # Number of VMs
  control_plane_count = 3
  worker_count        = 3
}
With this setup, control-plane nodes will get the following ip addresses:
172.16.16.21 … 172.16.16.23
And worker nodes will get these:
172.16.16.31 … 172.16.16.33
The IP offsets keep the addressing clean and predictable.
Even though everything physically runs on a single Hetzner EX44 server, I’m using a 3-control-plane + 3-worker layout because this matches a typical production Kubernetes topology. Kubespray supports single-master clusters, but a 3-node control plane gives you a proper etcd quorum and a structure identical to real HA clusters — which makes the setup easier to extend later and much closer to how Kubernetes is deployed in practice.
Generating Cloud-Init Snippets with Terraform (for_each)
Now that the cluster layout and IP plan are defined, the next step is to generate Cloud-Init configurations for each node.
Since the Proxmox/bpg provider doesn’t let us override hostnames directly during cloning, every VM needs its own Cloud-Init snippet with a unique hostname and Kubernetes-ready settings.
Terraform’s for_each makes this easy — we’ll dynamically create separate Cloud-Init files for all control-plane and worker nodes:
# ---------- CLOUD-INIT FILES PER WORKER NODE ----------
# Each worker VM gets its own cloud-init file with a unique hostname.
# The Proxmox provider doesn't support hostname overrides,
# so we generate separate snippets dynamically.

resource "proxmox_virtual_environment_file" "cloud_init_worker" {
  # "for_each" fans out resources; it needs a set of unique string keys.
  # We generate {"0","1","2"} for worker_count = 3.
  for_each = toset([for i in range(local.worker_count) : tostring(i)])

  content_type = "snippets"
  datastore_id = var.pm_snippets_datastore_id
  node_name    = var.pm_node_name

  source_raw {
    data = templatefile("${path.module}/templates/cloud-init-base.tftpl", {
      username       = var.ci_username
      password       = var.ci_password
      ssh_public_key = trimspace(var.ci_ssh_public_key)
      hostname       = "k8s-node-${tonumber(each.value) + 1}"
      enable_k8s     = true
    })

    # Make file names unique per node
    file_name = "cloud-init-worker-${tonumber(each.value) + 1}.yaml"
  }
}

# ---------- CLOUD-INIT FILES PER CONTROL-PLANE NODE ----------
# The same logic as above
resource "proxmox_virtual_environment_file" "cloud_init_control_plane" {
  for_each = toset([for i in range(local.control_plane_count) : tostring(i)])

  content_type = "snippets"
  datastore_id = var.pm_snippets_datastore_id
  node_name    = var.pm_node_name

  source_raw {
    data = templatefile("${path.module}/templates/cloud-init-base.tftpl", {
      username       = var.ci_username
      password       = var.ci_password
      ssh_public_key = trimspace(var.ci_ssh_public_key)
      hostname       = "k8s-control-${tonumber(each.value) + 1}"
      enable_k8s     = true
    })

    file_name = "cloud-init-control-plane-${tonumber(each.value) + 1}.yaml"
  }
}
Creating the Control Plane and Worker VMs
With all Cloud-Init snippets generated, we can finally create the actual virtual machines.
Each VM is cloned from the Proxmox template (VM ID 9000) and receives its own Cloud-Init file with a unique hostname, IP address, and Kubernetes-ready configuration.
Terraform’s for_each ties everything together:
- each control-plane VM references its own
cloud-init-control-plane-X.yaml, - each worker VM uses its own
cloud-init-worker-X.yaml.
Here’s the configuration that creates all three control-plane nodes:
# ---------- CONTROL-PLANE NODES ----------
resource "proxmox_virtual_environment_vm" "control_planes" {
  for_each = proxmox_virtual_environment_file.cloud_init_control_plane

  depends_on = [
    proxmox_virtual_environment_file.cloud_init_control_plane
  ]

  name            = "k8s-control-${tonumber(each.key) + 1}"
  node_name       = var.pm_node_name
  description     = "Kubernetes control-plane node"
  started         = true
  stop_on_destroy = true

  clone {
    vm_id        = 9000
    full         = true
    datastore_id = var.pm_lvm_datastore_id
  }

  bios    = "ovmf"
  machine = "q35"

  cpu {
    cores = 4
    type  = "host"
  }

  memory {
    dedicated = 4096
  }

  agent {
    enabled = true
  }

  disk {
    interface    = "scsi0"
    datastore_id = "local-lvm"
    size         = 20
    iothread     = true
    discard      = "on"
  }

  network_device {
    bridge = "vmbr0"
    model  = "virtio"
  }

  initialization {
    user_data_file_id = each.value.id

    ip_config {
      ipv4 {
        address = format(
          "%s/%d",
          cidrhost(local.network_cidr, local.control_plane_ip_offset + tonumber(each.key) + 1),
          local.network_mask
        )
        gateway = local.network_gateway_ip
      }
    }

    user_account {
      username = var.ci_username
      password = var.ci_password
    }

    dns {
      servers = ["1.1.1.1", "8.8.8.8"]
    }
  }
}
And here is the corresponding block that creates the three worker nodes:
# ---------- WORKER NODES ----------
resource "proxmox_virtual_environment_vm" "workers" {
  for_each = proxmox_virtual_environment_file.cloud_init_worker

  depends_on = [
    proxmox_virtual_environment_file.cloud_init_worker
  ]

  name            = "k8s-node-${tonumber(each.key) + 1}"
  node_name       = var.pm_node_name
  description     = "Kubernetes worker node"
  started         = true
  stop_on_destroy = true

  clone {
    vm_id        = 9000
    full         = true
    datastore_id = var.pm_lvm_datastore_id
  }

  bios    = "ovmf"
  machine = "q35"

  cpu {
    cores = 4
    type  = "host"
  }

  memory {
    dedicated = 4096
  }

  agent {
    enabled = true
  }

  disk {
    interface    = "scsi0"
    datastore_id = "local-lvm"
    size         = 20
    iothread     = true
    discard      = "on"
  }

  network_device {
    bridge = "vmbr0"
    model  = "virtio"
  }

  initialization {
    user_data_file_id = each.value.id

    ip_config {
      ipv4 {
        address = format(
          "%s/%d",
          cidrhost(local.network_cidr, local.worker_ip_offset + tonumber(each.key) + 1),
          local.network_mask
        )
        gateway = local.network_gateway_ip
      }
    }

    user_account {
      username = var.ci_username
      password = var.ci_password
    }

    dns {
      servers = ["1.1.1.1", "8.8.8.8"]
    }
  }
}
What this configuration gives us:
- Six VMs created fully automatically
- Unique Cloud-Init templates per node
- Static IPs for each control-plane and worker node
- Proper Ubuntu 22.04 image with q35 + UEFI
- CPU, RAM, disks and networking configured identically across the cluster
- All nodes boot up in a Kubernetes-ready state, ready for Kubespray
Applying the Terraform Configuration
Once everything is defined — Cloud-Init snippets, control-plane VMs, and worker VMs — you can create the entire 6-node topology with two simple commands:
terraform plan -out="k8s"
terraform apply -auto-approve "k8s"
A quick reminder about the issue mentioned at the beginning of this post:
if you don’t want to run into the “Still creating…” hang or partial state drift, run Terraform from a Hetzner Cloud VM in the same datacenter as your Proxmox host.
Even the smallest instance is more than enough — the important part is low RTT during VM provisioning.
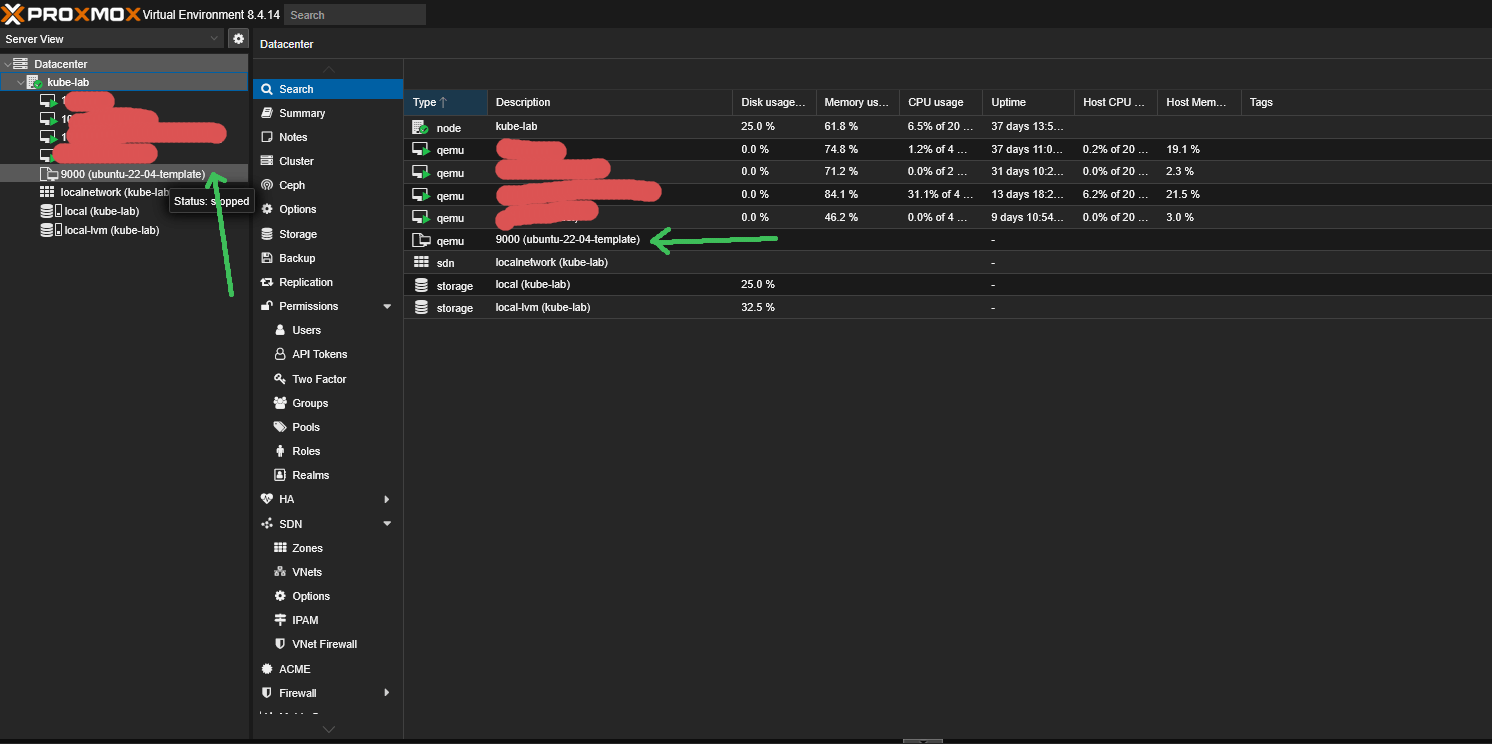
After a few minutes, you should see all 6 VMs (3 control planes + 3 workers) created in Proxmox, each with its own Cloud-Init configuration, static IP address, and Kubernetes-ready setup.
What’s Next: SSH Access Behind NAT & Automatic Kubespray Inventory
At this point we now have six fully provisioned VMs (3 control planes + 3 workers), each bootstrapped with Cloud-Init and ready for Kubernetes.
But there’s one more problem to solve before we can actually deploy a cluster:
👉 all nodes live behind Proxmox NAT — there’s no direct route from our laptop to any of the VMs.
➜ In the next article (Part 4), we’ll cover:
- How to use your Hetzner EX44 host as a bastion (“jump proxy”)
- How to generate a Kubespray-ready
inventory.iniautomatically from Terraform outputs - How to run Kubespray against nodes behind NAT without exposing a single VM to the public Internet
- How to provision a full Kubernetes cluster (3× control-plane + 3× workers) from your laptop with a single command
ℹ️ Don’t want to create all Terraform files from this guide on your own?
I’ve updated the GitHub repo with:
- a complete Terraform example that generates per-node Cloud-Init snippets (unique hostname, SSH keys, Kubernetes-ready settings);
- and the Terraform configuration that clones all control-plane and worker VMs from the Proxmox template and assigns static IPs automatically.
With these files, you can bring up a fully configured 6-node VM layout — identical CPU/RAM/disk settings, stable hostnames, static networking, and Cloud-Init applied on first boot — all in just a few minutes on a clean Hetzner server.
💡 If you found this guide useful, follow me on LinkedIn — I regularly share deep-dive content on Kubernetes, Proxmox, and real-world performance engineering.