64GB RAM Kubernetes Cluster for €39/month — Part 1: Proxmox & LVM & NAT
📌 This is Part 1 of a multi-part series on building a Kubernetes homelab / stage environment with Proxmox and Hetzner hardware.
In this first part we’ll focus only on preparing the host machine — making sure the hardware is healthy, installing Debian 12, setting up Proxmox VE, configuring clean LVM storage, and enabling NAT networking for VMs.
👉 What you’ll get by the end of this part:
- A Hetzner EX44 server with RAID-0 across two NVMe SSDs
- Proxmox VE installed on top of Debian 12
- Clean LVM storage (ready for both thin and thick volumes)
- NAT networking configured for your VMs
This setup works equally well as a homelab for learning or a staging environment for testing apps before production. In the next parts, we’ll use Terraform and Kubespray to spin up multiple Ubuntu VMs and bootstrap a multi-node Kubernetes cluster.
Why bother with a full cluster? Because sometimes you need more than just a single-node setup:
- Stress-testing Postgres under real I/O pressure
- Debugging ClickHouse performance bottlenecks
- Simulating realistic workloads and networking before going live
Tools like minikube and k3s are excellent for local development and edge/IoT cases, but they can’t reproduce these scenarios. That’s why we’ll build a multi-node cluster on real dedicated hardware. It’s not production-grade (no redundancy, single host), but it’s close enough for stage-like testing and performance experiments.
For cost-efficiency, I’ll use Hetzner’s EX series (their cheapest line of dedicated servers), and automate the host setup with Ansible. Kubernetes automation comes later.
Step 0: Choosing and ordering a server on Hetzner
In this first part we’ll just prepare the host.
For this project, we’ll use Hetzner’s EX series — an affordable line of dedicated servers that still offers excellent performance for Kubernetes experiments.
At the time of writing, I picked the EX44 model for ~€39/month:
- Intel Core i5-13500 (14 cores / 20 threads)
- 64 GB DDR4 RAM
- 2 × 512 GB NVMe SSD
- 1 Gbps unmetered connection
You can view it here: https://www.hetzner.com/dedicated-rootserver/ex44
Hetzner usually provisions these within 5–10 minutes.
Here’s what the ordering screen looks like:
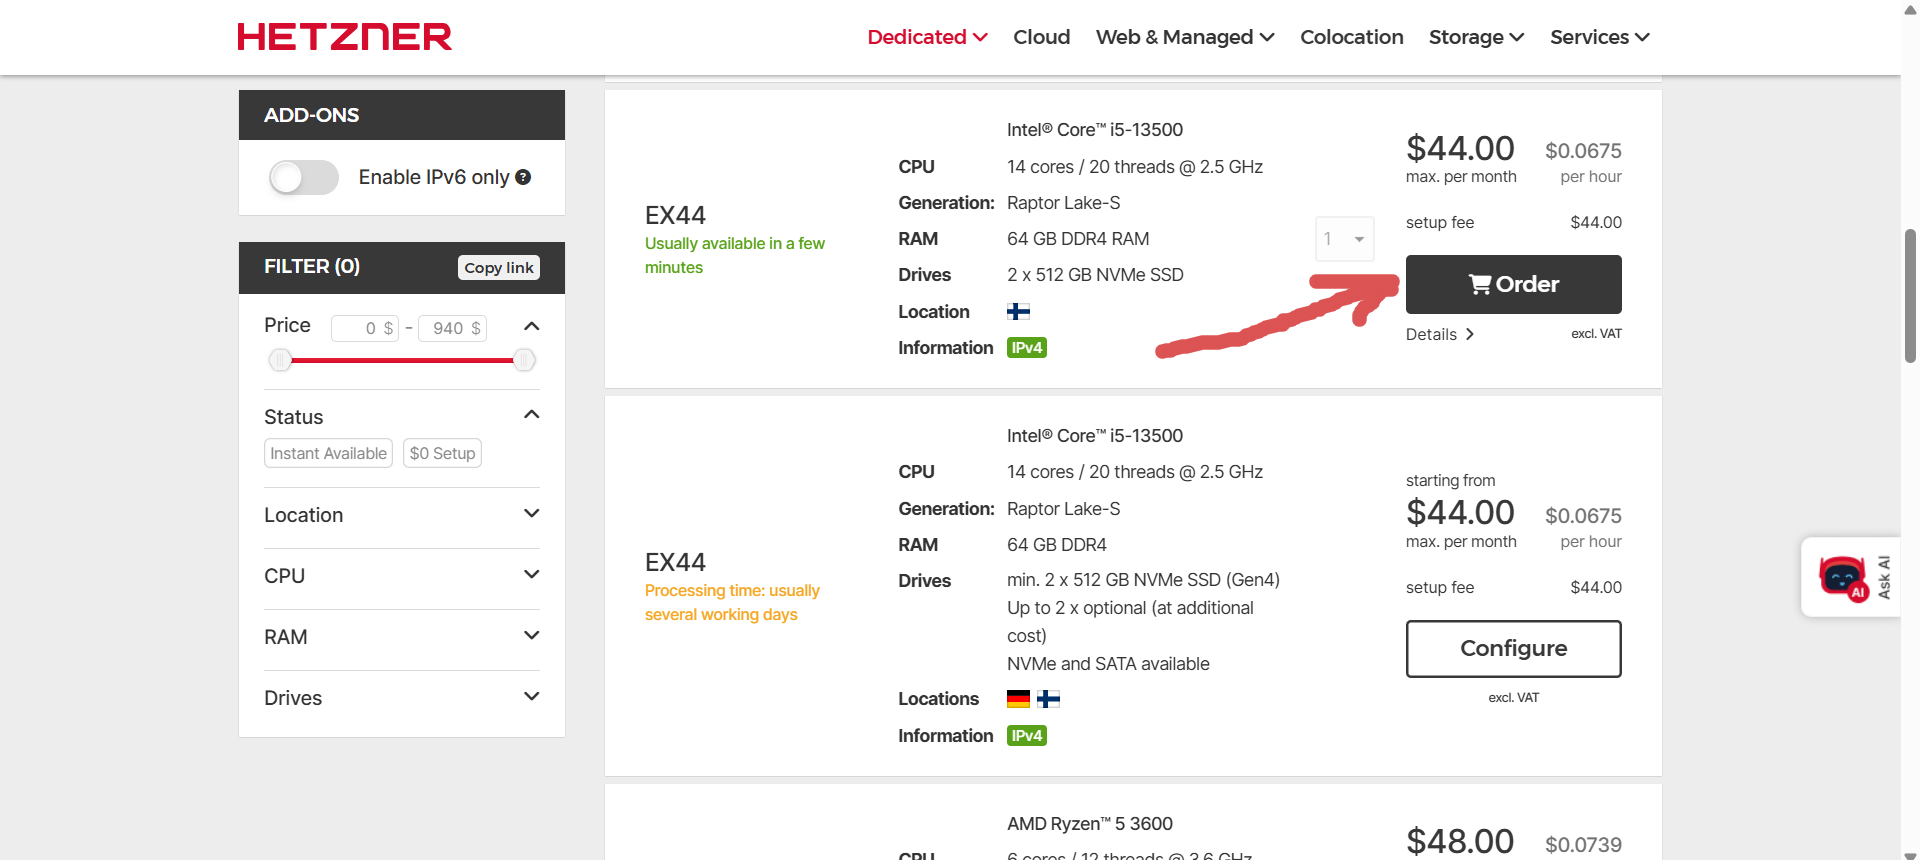
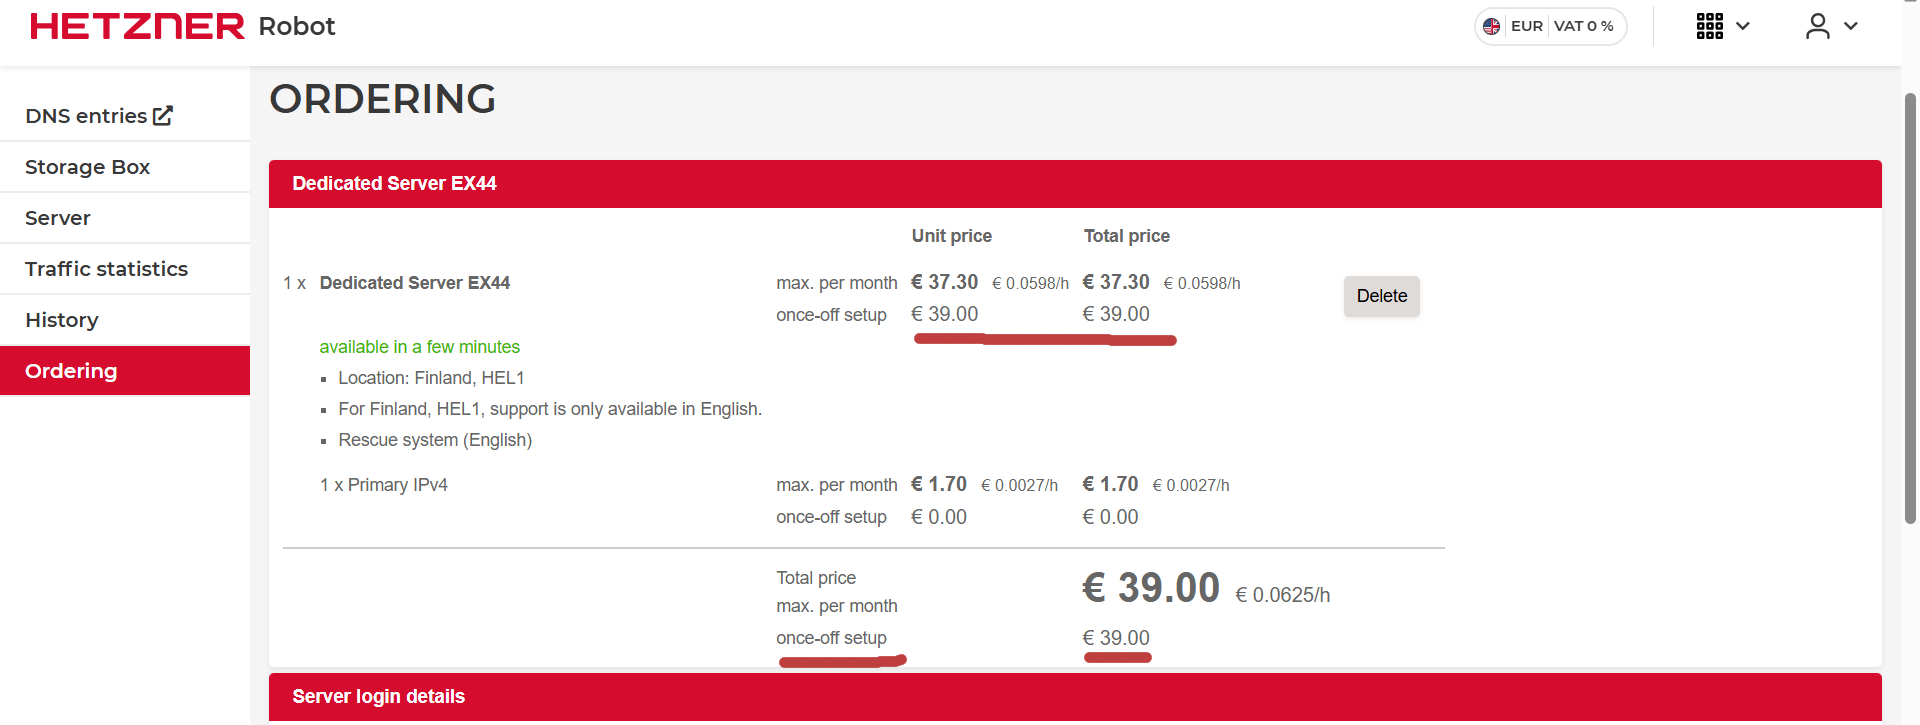
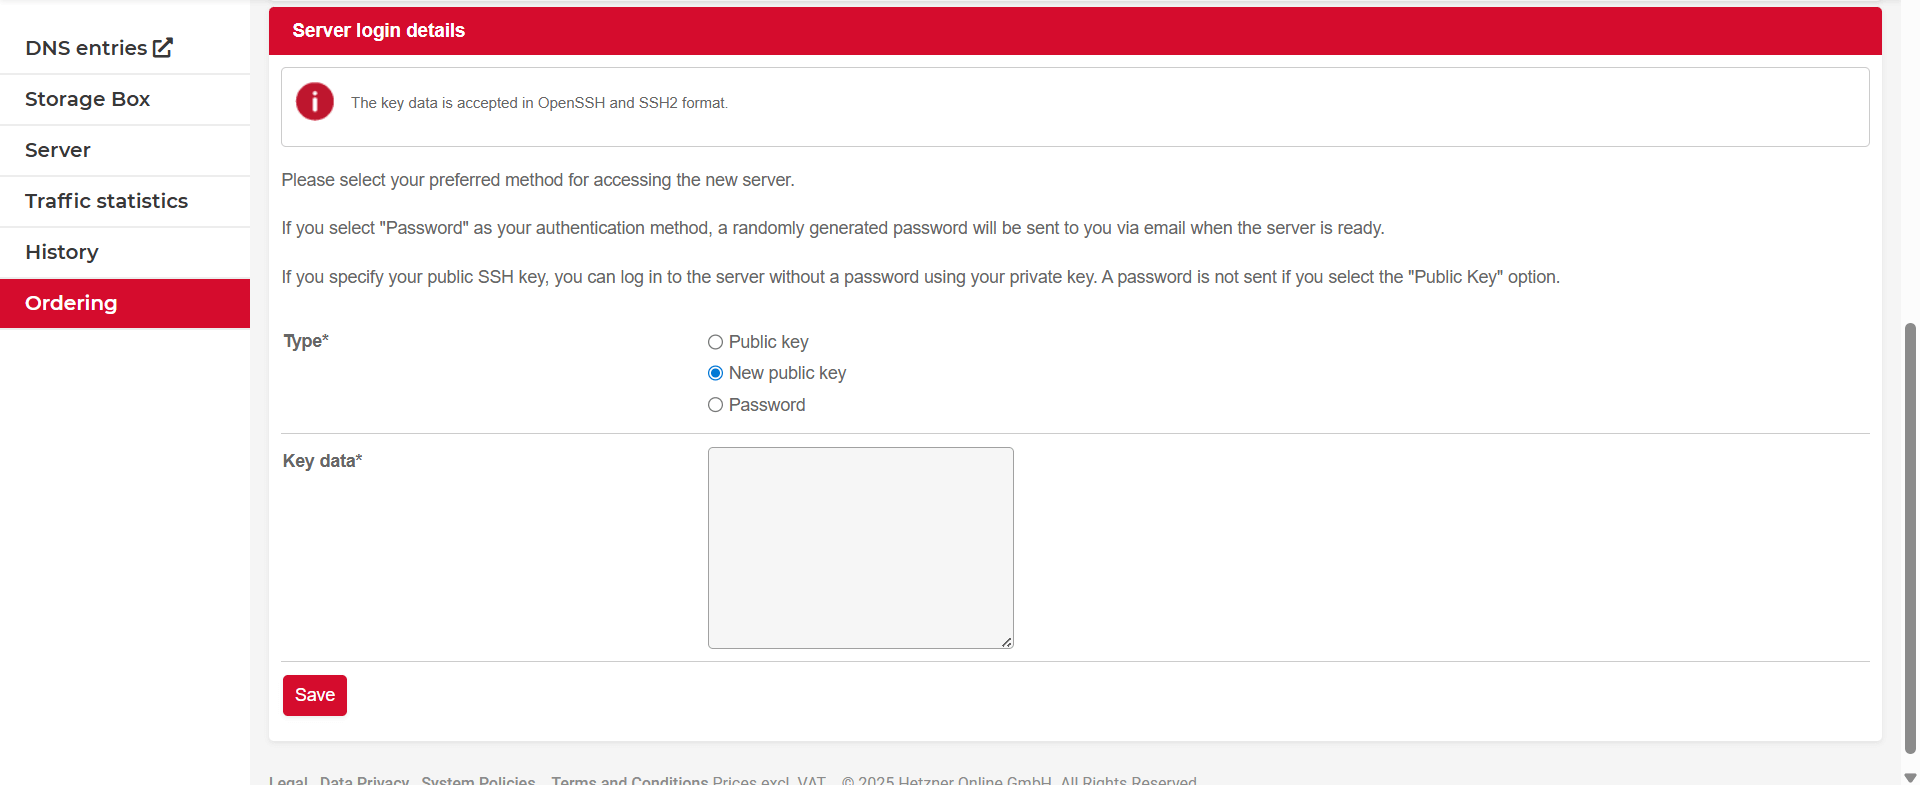
💡 Tip: Make sure to copy your SSH public key carefully — if you lose access, you’ll need to use Rescue Mode.
Once the server is ready, you’ll receive its IP address and root login via email.
Step 1: Checking SSD and RAM health before installing anything
Before we install Proxmox or deploy any Kubernetes components, it’s wise to check that the hardware we just rented is actually in good shape.
Hetzner’s EX series offers great value, but many of the components are refurbished or reused. Spending 10–15 minutes verifying SSD health and RAM stability can save you hours of painful debugging later.
Checking SSD health with smartctl
Сheck both NVMe disks:
smartctl -a /dev/nvme0n1
smartctl -a /dev/nvme1n1
You should look at the following fields:
Percentage Used— shows SSD wear level; anything under 10% is finePower On Hours— gives you an idea of how old the drive isMedia and Data Integrity Errors- should always be zeroData Units Written— useful if you're curious about drive usage so far
Here’s a real example from one of my EX44 servers, freshly provisioned:
SMART overall-health self-assessment test result: PASSED
Percentage Used:                    0%
Power On Hours:                     7
Data Units Written:                 546 GB
Media and Data Integrity Errors:    0
Temperature:                        28 Celsius
✅ This drive is basically new — only 7 hours of uptime and no signs of wear or errors.
If you see a Percentage Used above ~10% or any errors, that’s a red flag — consider asking Hetzner support for a replacement. They’re usually responsive, even for EX servers.
Stress-testing RAM with memtester (inside tmux)
Full memtest86+ isn’t easily available in Hetzner’s UEFI-only Rescue System, but there’s a solid alternative: run memtester from within Linux, and use tmux to keep it running even if SSH drops.
💡 I actually lost my firstmemtesterrun due to an SSH timeout. That’s when I remembered to always usetmuxfor long-running stress tests — and you should too.
Install the tools
apt update
apt install memtester tmux -y
Start a tmux session
tmux new -s memtest
Everything you launch inside this session will stay alive, even if you disconnect from SSH.
Launch RAM tests
You can either run multiple tests in parallel:
memtester 16G 3 &
memtester 16G 3 &
memtester 16G 3 &
memtester 12G 3 &
Or (recommended) run each one in a separate tmux window to monitor them individually:
- Create a new window:
Ctrl + B, thenC - Switch between windows:
Ctrl + B, thenN(next) orP(previous)
Each test will take 10–15 minutes per pass, depending on the CPU and memory speed.
Detach and reattach
To leave the session safely:
Ctrl + B, then D
To return later:
tmux attach -t memtest
What to expect
Each memtester instance will output its own progress through multiple patterns (Stuck Address, Bit Flip, Random Value, etc.).
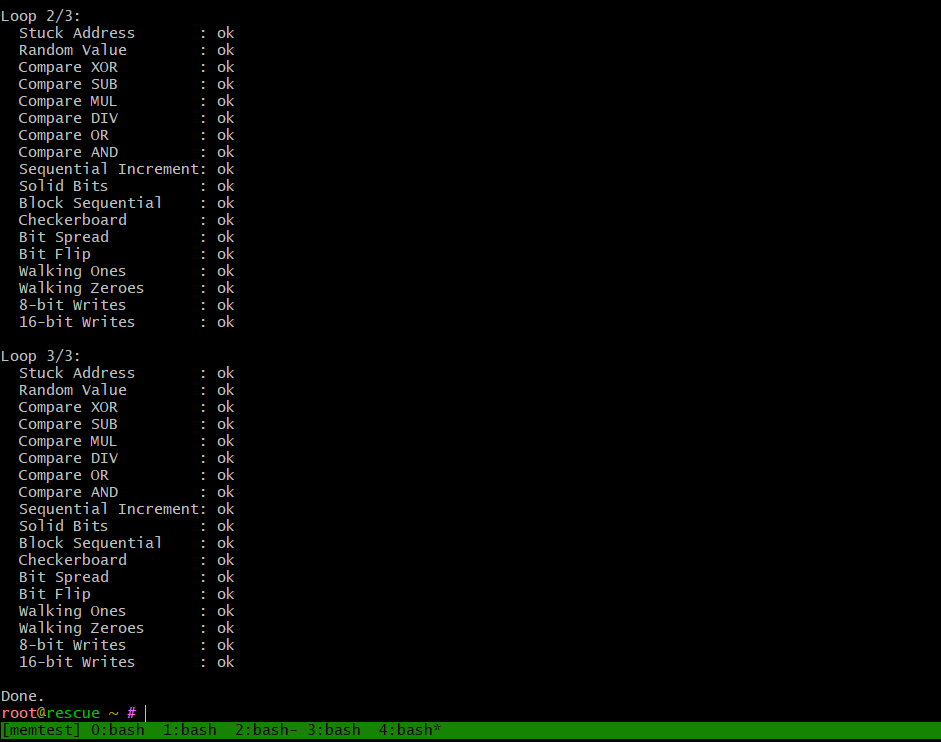
✅ If all goes well, you’ll seeokfor each test. Any memory errors will be clearly flagged withFAILURE.
💡 Tip: If you want to test all 64 GB, just divide the total across multiple processes — the Linux system itself needs a few gigabytes to function.
After running 4 parallel memtester instances, you can see that almost the entire 64 GB of RAM is being exercised:
root@rescue ~ # free -m
               total        used        free      shared  buff/cache   available
Mem:           64127       62477        1581          62         736        1650
Swap:              0           0           0
Step 2: Preparing LVM storage for Proxmox (skip ext4, no ZFS)
Once you’ve verified that your SSDs and RAM are healthy, it’s time to install Proxmox VE — a powerful open-source virtualization environment that will manage our Kubernetes nodes.
While Proxmox offers ZFS as a default option, I intentionally set up LVM storage for this build, leaving the main LV data volume unformatted (no ext4).
ℹ️ Why I went with LVM (thick/thin) instead of ZFS or ext4 directory
- Lower latency for databases: With LVM, VM disks are created directly as logical volumes (LVs), not as files inside a filesystem. This avoids FS-over-FS overhead and gives more predictable performance for ClickHouse, Postgres, and log-heavy workloads.
- Flexibility: I can split the volume group into both LVM-thin (for snapshots, thin provisioning, most VMs) and LVM-thick (for latency-sensitive stress tests).
- Closer to production: This layout reflects how real-world clusters are often built, giving more honest numbers in benchmarks.
📌 If you don’t specifically need ZFS-level data integrity or snapshotting for this lab, a clean LVM backend is faster, simpler, and much closer to bare-metal performance.
Boot into Rescue System
To install Proxmox, boot the server into Rescue Mode from the Hetzner Robot panel:
- Go to robot.hetzner.com/server
- Select your server → Rescue
- Choose Linux 64-bit
- Click Activate rescue system
- Reboot with Execute an automatic hardware reset
The temporary root password will appear directly in the Rescue tab.
Install Debian 12
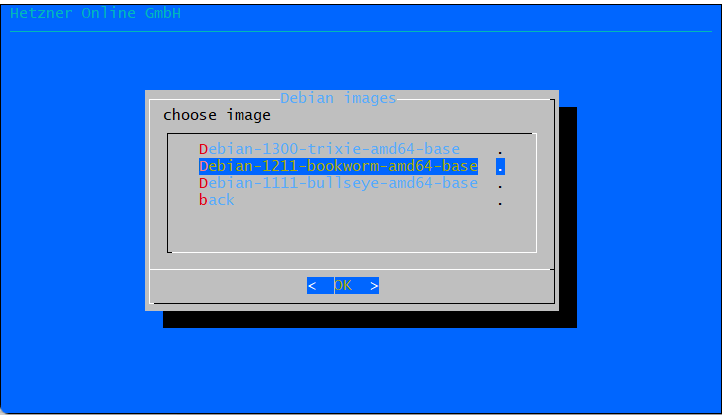
Before we install Proxmox VE, we’ll set up a clean Debian 12 base system using Hetzner’s built-in installimage tool — a simple and fast way to deploy Linux on a dedicated server from the Rescue System. Type:
installimage
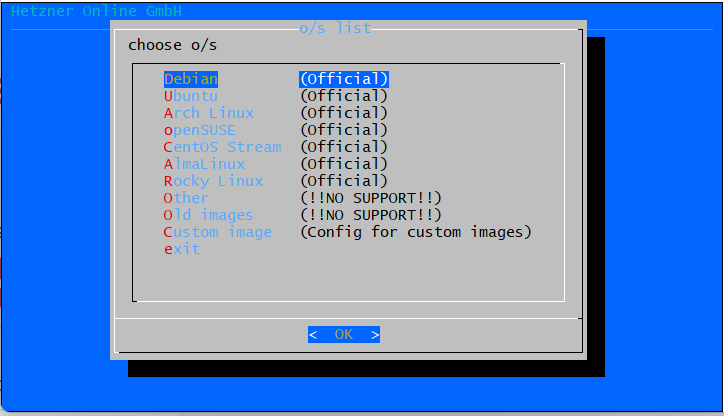
Choose Debian and Debian 12:
ℹ️ Using RAID-0 for Maximum Disk Throughput
For this Kubernetes lab, I decided to use RAID-0 across both NVMe SSDs.
💡 Why RAID-0?
- ✅ Doubles sequential throughput across two NVMe drives
- ✅ More usable space (~1 TB total instead of 512 GB)
- 🚫 No redundancy — but this is fine for a staging/lab cluster where data can be rebuilt
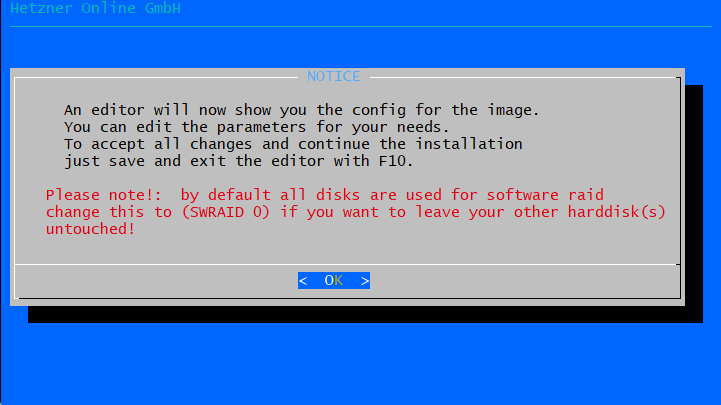
In the interactive installer:
- SWRAID: set to
1(enabled) - SWRAIDLEVEL: set to
0(RAID-0) - DRIVE1:
/dev/nvme0n1 - DRIVE2:
/dev/nvme1n1
📝 Example config for RAID-0 + LVM + ext4
# Disks
DRIVE1 /dev/nvme0n1
DRIVE2 /dev/nvme1n1

# Software RAID
SWRAID 1
SWRAIDLEVEL 0        # 0 = RAID0 (speed/space), use 1 for RAID1 (redundancy)

HOSTNAME kube-lab

# Partitions
PART /boot/efi esp 256M
PART /boot ext4 512M

# LVM
PART lvm vg0 all

# Logical Volumes
LV vg0 root / ext4 50G
LV vg0 swap swap swap 8G

# <-- Do not define LV data here! leave the remaining space free in the VG -->
Why we let Proxmox manage the VG directly
Instead of formatting the remaining space as an ext4 directory, we left it free inside the volume group. This way:
-
Better performance: VM disks are created as logical volumes, not as files inside a filesystem. That removes an extra FS layer and reduces latency — critical for databases like ClickHouse or Postgres.
-
More flexibility: From the same VG we can carve out both LVM-thin (snapshots, overprovisioning) and LVM-thick (bare-metal–like performance).
-
Closer to production: Real clusters typically use LVM/LVM-thin, so stress-test results will be more representative.
📌 In short: leaving the VG free gives Proxmox full control, avoids cleanup steps, and delivers the most accurate performance numbers for our workloads.
Here’s a diagram of what this layout looks like in practice:
 ┌──────────────────────────────────────────────────────────────┐
 │           Hetzner EX44 (Dedicated Server, €39/mo)            │
 │   Intel i5-13500 • 64 GB RAM • 2 × 512 GB NVMe • 1 Gbps      │
 └──────────────────────────────────────────────────────────────┘

                    [ NVMe0 ] + [ NVMe1 ]
                              │
                              ▼
   ┌──────────────────── RAID-0 (~1 TB) ────────────────────┐
   │                                                        │
   │                  Volume Group (vg0)                    │
   │ ┌───────────────┐ ┌───────────────┐ ┌────────────────┐ │
   │ │ LV root(ext4) │ │   LV swap     │ │   Free space   │ │
   │ │     50G       │ │      8G       │ │  (unformatted) │ │
   │ └───────────────┘ └───────────────┘ └────────────────┘ │
   │    Debian OS         Safety net      Proxmox VM disks  │
   └────────────────────────────────────────────────────────┘
Save and install
Save the config and exit (F10). The installer will set up the disks, create the LVM volumes, and deploy Debian 12 (Bookworm).
After a few minutes you’ll have a clean base system with:
- root (50G, ext4)
- swap (8G)
- a free volume group vg0 ready for Proxmox storage
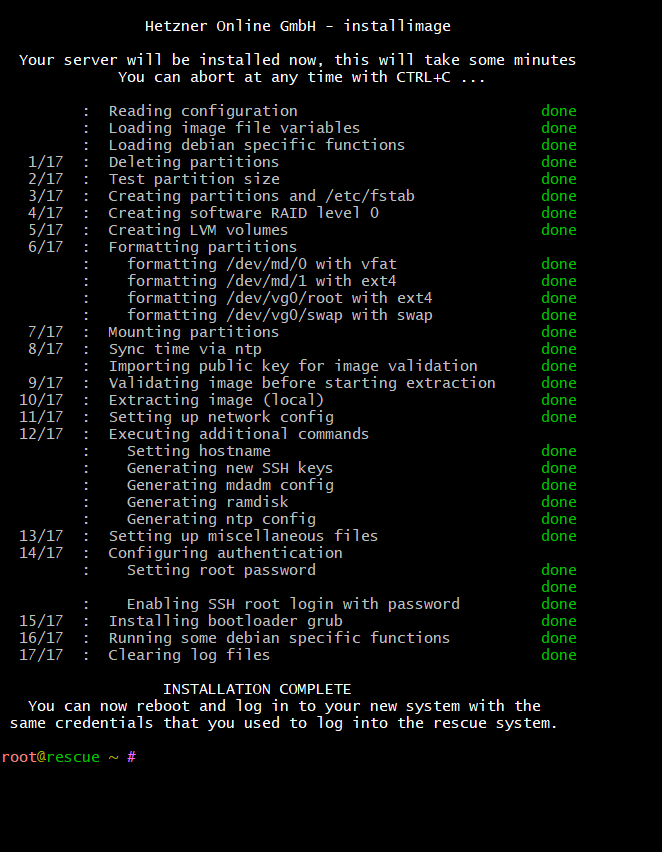
Reboot the server when prompted, and you’re ready to move on to installing Proxmox VE.
Next, we’ll install Proxmox VE on top of this Debian base system and connect our LVM storage as both LVM-thin and LVM-thick backends.
Step 3: Install Proxmox VE on Debian 12
Now that we have a clean Debian 12 base system with RAID-0 and an unformatted LVM volume group (vg0), it's time to install Proxmox VE on top.
We’re using the “Debian-first” method rather than the official Proxmox ISO — this gives us more control over disk layout and compatibility with Hetzner’s Rescue System.
⚙️ Install Proxmox packages
Start by updating the system and configuring the Proxmox repository:
echo "deb http://download.proxmox.com/debian/pve bookworm pve-no-subscription" | tee /etc/apt/sources.list.d/pve-install.list
wget -qO - http://download.proxmox.com/debian/proxmox-release-bookworm.gpg | gpg --dearmor -o /etc/apt/trusted.gpg.d/proxmox-release.gpg
apt update
Now install the core Proxmox packages:
apt install proxmox-ve
After reboot, Proxmox should be up and running on https://<your-server-ip>:8006
💾 Add LVM storage to Proxmox
Now we’ll connect our unformatted volume group (vg0) to Proxmox and use it as a storage backend.
- Open the Proxmox Web UI (
https://<your-ip>:8006) - Go to
Datacenter → Storage → Add → LVM - Set:
ID -> local-lvm,Volume group -> vg0,Content -> Disk image, Container - Click
Add.
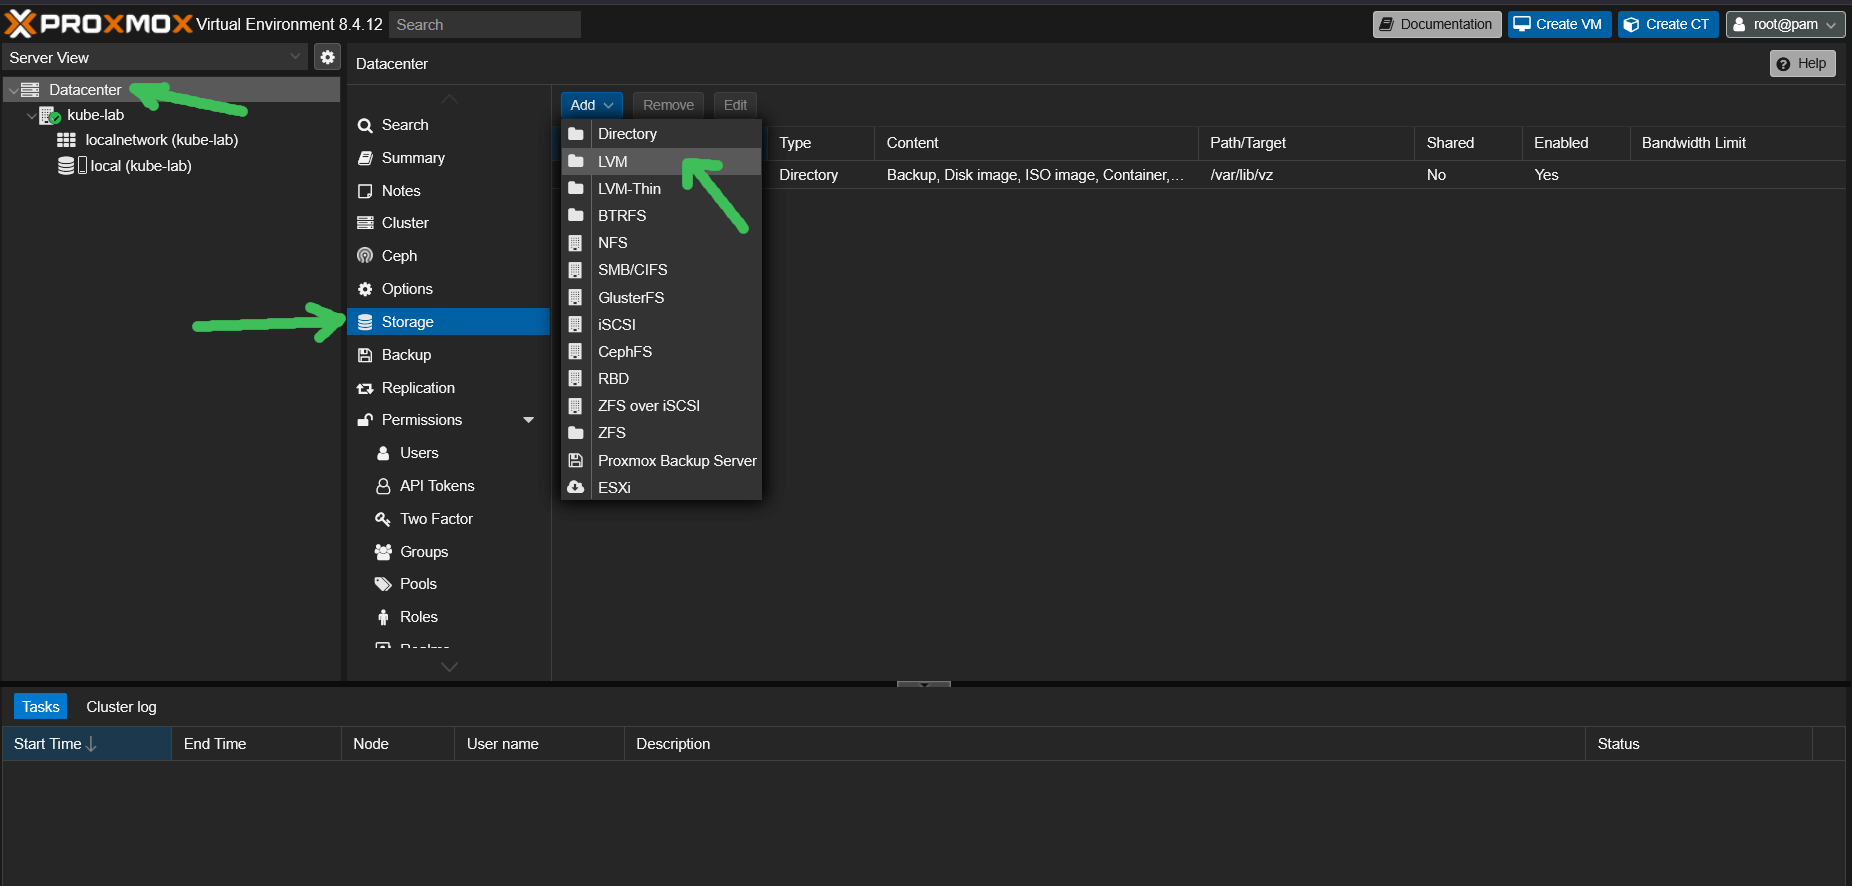

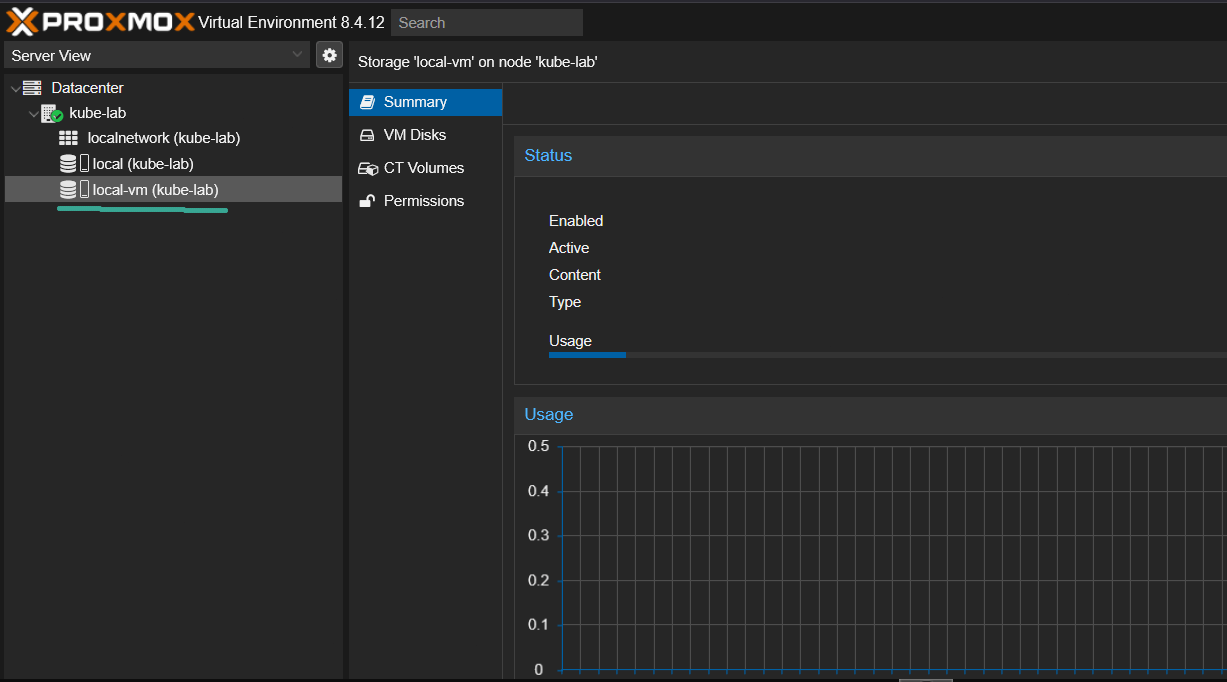
📌 You now have full-speed LVM-backed storage for VM disks, without any ext4 intermediate layer.
🌐 Configure Proxmox network with NAT (Masquerade)
After installing Debian, your public network interface (e.g., enp5s0) is already configured by Hetzner. To allow your Proxmox virtual machines to access the internet via NAT, you need to append a bridge configuration.
🔧 Append this block at the end of /etc/network/interfaces:
auto vmbr0
iface vmbr0
    address 172.16.16.1/24
    bridge-ports none
    bridge-stp off
    bridge-fd 0
    post-up   echo 1 > /proc/sys/net/ipv4/ip_forward
    post-up iptables -t nat -A POSTROUTING -s '172.16.16.0/24' -o <your-public-interface> -j MASQUERADE
    post-down iptables -t nat -D POSTROUTING -s '172.16.16.0/24' -o <your-public-interface> -j MASQUERADE
    post-up iptables -t raw -I PREROUTING -i fwbr+ -j CT --zone 1
    post-down iptables -t raw -D PREROUTING -i fwbr+ -j CT --zone 1
💡 This setup creates a private subnet (172.16.16.0/24) for your VMs, which are connected via vmbr0. Outbound traffic is masqueraded through your public interface, allowing full internet access from within your virtual machines, something like that:
              Internet
                 │
        ┌────────┴────────┐
        │ Public Interface│  ← enp5s0 (Hetzner public IP)
        └────────┬────────┘
                 │
            [NAT: MASQUERADE]
                 │
             vmbr0 (bridge)
         172.16.16.1/24 (gateway)
                 │
   ┌─────────────┼─────────────┐
   │             │             │
┌──▼──┐       ┌──▼──┐       ┌──▼──┐
│ VM1 │       │ VM2 │       │ VM3 │
└─────┘       └─────┘       └─────┘
172.16.16.2  172.16.16.3  172.16.16.4
🔄 Apply the config
ifreload -a
What’s Next & How to Automate It
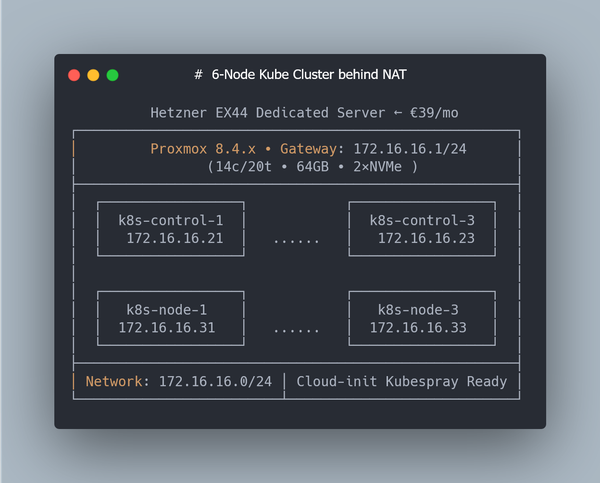
At this point we have Proxmox running on Hetzner with RAID-0, LVM storage, and NAT networking. The environment is now ready to spin up Kubernetes nodes.
ℹ️ Don’t want to manually configure Proxmox, storage, and NAT networking after installing Debian? I published an Ansible role on GitHub that:
- installs Proxmox VE on Debian
- configures NAT masquerade networking
- sets up LVM storage for VM disks
With this role you can turn a fresh Hetzner server into a fully configured Proxmox host in about 10 minutes.
➜ In the next article, we’ll create a cloud-init VM template and use Terraform to generate multiple Ubuntu VMs for our Kubernetes cluster, which we’ll then provision with Kubespray.
💡 If you found this guide useful, follow me on LinkedIn — I regularly share deep-dive content on Kubernetes, Proxmox, and real-world performance engineering.